In this post we will explore how to build a stockbroker agent using Next.js, AI SDK, and OpenAI. We will create an autonomous agent that can fetch real-time stock quotes, retrieve company profiles, manage portfolio positions, execute stock buy and sell orders, and provide financial analysis and insights.
Our stockbroker agent will:
Next.js is an open-source web development framework created by Vercel providing React-based web applications with server-side rendering and static site generation. It provides features like:
AI SDK is a library from Vercel which makes it easy to build AI-powered applications similar to langchain.
Let's start by setting up our Next.js project and install the necessary packages.
npx create-next-app@latest stock-management-agent
cd stock-management-agent
When prompted, select the following options:
npm install ai @ai-sdk/react @ai-sdk/openai zod react-markdown
Here's what each package does:
ai: Core AI SDK library for AI functionality@ai-sdk/react: React hooks for AI SDK@ai-sdk/openai: OpenAI integration for AI SDKzod: Schema declaration and validationreact-markdown: Rendering markdown responsesCreate a .env.local file in the project root directory:
OPENAI_API_KEY=your_openai_api_key
FINANCIAL_MODELING_PREP_API_KEY=your_financial_modeling_prep_api_key
TAVILY_API_KEY=your_tavily_api_key
OPENAI_API_KEY : OpenAI API key for interacting with language model. This will change based on the model you are using.
FINANCIAL_MODELING_PREP_API_KEY : API key for fetching financial data about companies and stock prices. You can get it from Financial Modeling Prep. Free tier is available.
TAVILY_API_KEY : API key for doing web searches. You can get it from Tavily. Free tier is available.
Make sure to add
.env.localto your.gitignorefile to avoid exposing your API keys.
Here's the basic structure we'll create:
stock-management-agent/
├── app/
│   ├── api/
│   │   ├── chat/
│   │   │   └── route.ts       # AI chat endpoint without human-in-the-loop
│   │   └── chat-hil/
│   │       └── route.ts       # AI chat endpoint with human-in-the-loop
│   ├── hil/
│   │   └── page.tsx           # Human-in-the-loop chat interface
│   ├── layout.tsx
│   └── page.tsx               # Main chat interface
├── lib/
│   ├── config/
│   │   └── apiConfig.ts       # API configuration for financial data
│   ├── tools/
│   │   ├── createStockOrder.ts
│   │   ├── getCompanyProfile.ts
│   │   ├── getFinancialStatements.ts
│   │   ├── getPortfolioPositions.ts
│   │   ├── getStockQuote.ts
│   │   ├── webSearch.ts
│   │   └── index.ts
│   ├── util/
│   │   ├── middleware.ts      # AI SDK middleware for logging
│   │   └── hil-utils.ts       # Utility functions for human-in-the-loop
│   └── db.ts                  # Database functions and types
└── prisma/
    └── schema.prisma          # Database schema
The AI SDK provides several ways to interact with language models. Let's explore them.
We can use generateText to get a simple text response from a language model:
// app/api/chat/route.ts
import { openai } from "@ai-sdk/openai";
import { generateText } from "ai";

export async function POST(req: Request) {
  const { messages } = await req.json();
  const {text} = await generateText({
    model: openai("gpt-4o"),
    messages,
    system: `
        You are a polite stock advisor assistant who provides advice based on
        the latest stock price, company information and financial results.
    `,
  });
  return Response.json({ text });
}
Sometimes we need to get structured data from our AI models rather than just text. We can do that using generateObject:
import { openai } from "@ai-sdk/openai";
import { generateObject } from "ai";
import { z } from "zod";

export async function POST(req: Request) {
  const { messages } = await req.json();
  const response = await generateObject({
    model: openai("gpt-4o"),
    messages,
    system: `
        You are a polite stock advisor assistant who provides structured responses based on
        the latest stock price, company information and financial results.
    `,
    schema: z.object({
        stockAdvice: z.array(z.object({
            symbol: z.string(),
            advice: z.string(),
            price: z.number(),
        }))
    }),
  });

  return response.toJsonResponse();
}
Above code will return an array of stock advice objects with symbol, advice, and price.
For long-running interactions or multi-step conversations, we can use streamText to stream the responses from the AI model:
// app/api/chat/route.ts
import { openai } from "@ai-sdk/openai";
import { streamText } from "ai";
export async function POST(req: Request) {
  const { messages } = await req.json();

  const result = streamText({
    model: openai("gpt-4o"),
    messages,
    system: `
        You are a polite stock advisor assistant who provides advice based on
        the latest stock price, company information and financial results.
        All your responses should be in markdown format.
    `,
  });

  return result.toDataStreamResponse();
}
In our case we will use streamText to get a stream of responses from the AI model in the chat endpoint.
Here's how we implement a chat UI component with streaming:
// app/page.tsx
"use client";

import { useState } from "react";
import { useChat } from "@ai-sdk/react";
import ReactMarkdown from 'react-markdown';

export default function Chat() {
  const {
    messages,
    input,
    handleInputChange,
    handleSubmit,
    status
  } = useChat();

  const isLoading = status === "submitted";

  return (
    <div className="flex flex-col w-full max-w-4xl mx-auto p-4 h-[90vh]">
      <h1 className="text-2xl font-bold mb-4">Stock Management Assistant</h1>

      <div className="flex-1 overflow-y-auto mb-4 border rounded-md p-4 bg-white">
        {messages.map((message, index) => (
          <div key={message.id || index} className={`mb-6 p-5 rounded-lg ${
            message.role === "user" ? "bg-blue-50" : "bg-slate-50"
          }`}>
            <div className="font-bold mb-3">
              {message.role === "user" ? "You" : "Assistant"}
            </div>

            <div className="prose prose-slate max-w-none">
              {message.parts?.map((part, partIndex) => {
                if (part.type === "text") {
                  return (
                    <ReactMarkdown key={partIndex}>
                      {part.text}
                    </ReactMarkdown>
                  );
                }
                return null;
              })}
            </div>
          </div>
        ))}

        {isLoading && (
          <div className="flex items-center space-x-2 p-4 bg-gray-50 rounded-lg">
            <div className="animate-pulse flex space-x-1">
              <div className="h-3 w-3 bg-blue-400 rounded-full"></div>
              <div className="h-3 w-3 bg-blue-400 rounded-full"></div>
              <div className="h-3 w-3 bg-blue-400 rounded-full"></div>
            </div>
            <div className="text-gray-600 font-medium">Assistant is thinking...</div>
          </div>
        )}
      </div>

      <form onSubmit={handleSubmit} className="flex gap-3">
        <input
          type="text"
          value={input}
          onChange={handleInputChange}
          placeholder="Ask about stocks, place orders, or get market information..."
          className="flex-1 p-4 border border-gray-300 rounded-md"
        />
        <button
          type="submit"
          disabled={isLoading || !input.trim()}
          className="px-6 py-3 bg-blue-500 text-white rounded-md disabled:bg-blue-300"
        >
          {isLoading ? 'Sending...' : 'Send'}
        </button>
      </form>
    </div>
  );
}
We are using useChat hook from @ai-sdk/react to interact with the AI model. The hook provides methods for handling user input, submitting messages, and getting the AI responses. This will stream the responses from the AI model as the user interacts with the chat interface.
Using status from the hook, we can show a loading indicator when the AI is processing the user input.
We are using ReactMarkdown to render the AI responses which are in Markdown format.
Sometimes LLMs need to interact with the external world to perform certain tasks. For example, in our case, the AI model needs to fetch stock prices, company information, and financial statements which it can't do on its own.
This is where tools come in. Tools are functions that the AI agent can call to interact with external systems or perform specific tasks.
How it works:
Let's implement several tools for our stock management agent.
We will be fetching the latest stock prices and financial data from an external API. Let's create a configuration file for the API:
First, let's create a configuration file for our financial API:
// lib/config/apiConfig.ts
export const stockApiConfig = {
  baseUrl: 'https://financialmodelingprep.com/api/v3',

  getApiKey: (): string => {
    const apiKey = process.env.FINANCIAL_MODELING_PREP_API_KEY;
    if (!apiKey) {
      throw new Error('FINANCIAL_MODELING_PREP_API_KEY is not defined in environment variables');
    }
    return apiKey;
  },

  buildUrl: (endpoint: string): string => {
    return `${stockApiConfig.baseUrl}${endpoint.startsWith('/') ? endpoint : '/' + endpoint}?apikey=${stockApiConfig.getApiKey()}`;
  }
};
You can get API key from Financial Modeling Prep and add it to .env.local file as FINANCIAL_MODELING_PREP_API_KEY.
We can create tools using the tool function from the ai package. Here's an example of a tool to fetch the latest stock quote:
We are passing the tool function an object with the following properties:
description: A description of what the tool doesparameters: A Zod schema describing the expected input parametersexecute: The function that implements the tool's logic// lib/tools/getStockQuote.ts import { tool } from "ai"; import { z } from "zod"; import { stockApiConfig } from "../config/apiConfig"; export const getStockQuoteTool = tool({ description: "Gets current stock quote information for a symbol", parameters: z.object({ symbol: z.string().describe("Stock symbol (e.g., AAPL, MSFT)"), }), execute: async ({ symbol }) => { try { const response = await fetch(stockApiConfig.buildUrl(`/quote/${symbol}`)); if (!response.ok) { throw new Error(`API request failed with status ${response.status}`); } const data = await response.json(); if (Array.isArray(data) && data.length === 0) { return { success: false, error: `No quote found for symbol ${symbol}`, }; } return { success: true, data: data[0], }; } catch (error) { console.error("Error fetching stock quote:", error); return { success: false, error: "Failed to fetch stock quote", }; } }, });
Now let's create tools for fetching financial statements:
// lib/tools/getFinancialStatements.ts
import { tool } from "ai";
import { z } from "zod";

const statementTypes = ['balance-sheet-statement', 'income-statement', 'cash-flow-statement'] as const;
type StatementType = typeof statementTypes[number];

// Common function to fetch financial statements
async function fetchFinancialStatement(symbol: string, statementType: StatementType) {
  try {
    const API_KEY = process.env.FINANCIAL_MODELING_PREP_API_KEY;
    const BASE_URL = 'https://financialmodelingprep.com/api/v3';
    const response = await fetch(
      `${BASE_URL}/${statementType}/${symbol}?apikey=${API_KEY}`
    );

    if (!response.ok) {
      throw new Error(`API request failed with status ${response.status}`);
    }

    const data = await response.json();

    if (Array.isArray(data) && data.length === 0) {
      return {
        success: false,
        error: `No ${statementType} found for symbol ${symbol}`
      };
    }

    return {
      success: true,
      data: data
    };
  } catch (error) {
    console.error(`Error fetching ${statementType}:`, error);
    return {
      success: false,
      error: `Failed to fetch ${statementType}`
    };
  }
}

export const getFinancialStatementsTool = tool({
  description: 'Gets financial statements (balance sheet, income statement, or cash flow statement) for a company',
  parameters: z.object({
    symbol: z.string().describe('Stock symbol (e.g., AAPL, MSFT)'),
    statementType: z.enum(statementTypes).describe('Type of financial statement to retrieve')
  }),
  execute: async ({ symbol, statementType }) => {
    return fetchFinancialStatement(symbol, statementType);
  }
});

export const getBalanceSheetTool = tool({
  description: 'Gets balance sheet statement for a company',
  parameters: z.object({
    symbol: z.string().describe('Stock symbol (e.g., AAPL, MSFT)')
  }),
  execute: async ({ symbol }) => {
    return fetchFinancialStatement(symbol, 'balance-sheet-statement');
  }
});

export const getIncomeStatementTool = tool({
  description: 'Gets income statement for a company',
  parameters: z.object({
    symbol: z.string().describe('Stock symbol (e.g., AAPL, MSFT)')
  }),
  execute: async ({ symbol }) => {
    return fetchFinancialStatement(symbol, 'income-statement');
  }
});

export const getCashFlowStatementTool = tool({
  description: 'Gets cash flow statement for a company',
  parameters: z.object({
    symbol: z.string().describe('Stock symbol (e.g., AAPL, MSFT)')
  }),
  execute: async ({ symbol }) => {
    return fetchFinancialStatement(symbol, 'cash-flow-statement');
  }
});
Let's implement a tool for creating stock orders:
We will store the stock orders in postgreSQL database using prisma ORM.
Let us use docker compose to start a postgreSQL database. Also, if you want to use pgAdmin to view the database, you can add it to the docker compose file.
services:
  postgres:
    image: postgres:16
    container_name: stock_management_postgres
    environment:
      POSTGRES_USER: postgres
      POSTGRES_PASSWORD: postgres
      POSTGRES_DB: stock_management
    ports:
      - "5432:5432"
    volumes:
      - postgres_data:/var/lib/postgresql/data
    networks:
      - stock_network

  pgadmin:
    image: dpage/pgadmin4
    container_name: stock_management_pgadmin
    environment:
      PGADMIN_DEFAULT_EMAIL: admin@admin.com
      PGADMIN_DEFAULT_PASSWORD: admin
    ports:
      - "5050:80"
    depends_on:
      - postgres
    networks:
      - stock_network

networks:
  stock_network:
    driver: bridge

volumes:
  postgres_data:
npm install prisma @prisma/client
Now let us add the prism configuration in prisma/schema.prisma:
// prisma/schema.prisma
generator client {
  provider = "prisma-client-js"
}

datasource db {
  provider = "postgresql"
  url      = env("DATABASE_URL")
}

// Define your models here
model StockOrder {
  id        String   @id @default(cuid())
  userId    String
  symbol    String
  quantity  Int
  price     Float
  orderType String   // "BUY" or "SELL"
  timestamp DateTime @default(now())

  @@index([userId])
}
Now let us generate the prisma client:
npx prisma generate
Now let us create the database tables:
npx prisma migrate dev
npx prisma db push
Now let us add database url in .env file:
DATABASE_URL="postgresql://postgres:postgres@localhost:5432/stock_management"
Let us run the below commands to create the database tables:
npm run prisma:migrate
npx prisma db push
Let us add a db.ts file to interact with the database:
import { PrismaClient } from "@prisma/client";

export const prisma = new PrismaClient({
  log: ["query", "error", "warn"],
});

// Define order types
export type OrderType = "BUY" | "SELL";

// Interface for stock orders
export interface StockOrder {
  id: string;
  userId: string;
  symbol: string;
  quantity: number;
  price: number;
  orderType: OrderType;
  timestamp: Date;
}

export const stockOrders = {
  create: async (
    orderData: Omit<StockOrder, "id" | "timestamp">
  ): Promise<StockOrder> => {
    return prisma.stockOrder.create({
      data: orderData,
    }) as Promise<StockOrder>;
  },

  getByUser: async (userId: string): Promise<StockOrder[]> => {
    return prisma.stockOrder.findMany({
      where: { userId },
    }) as Promise<StockOrder[]>;
  },

  getById: async (orderId: string): Promise<StockOrder | null> => {
    return prisma.stockOrder.findUnique({
      where: { id: orderId },
    }) as Promise<StockOrder | null>;
  },
};
Now we can implement the tool to create stock orders:
// lib/tools/createStockOrder.ts
export const createStockOrderTool = tool({
  description:
    "Creates a new stock order (BUY or SELL) for a specified stock symbol",
  parameters: z.object({
    userId: z.string().describe("User ID making the order"),
    symbol: z.string().describe("Stock symbol (e.g., AAPL, MSFT)"),
    quantity: z
      .number()
      .int()
      .positive()
      .describe("Number of shares to buy or sell"),
    price: z.number().positive().describe("Price per share"),
    orderType: z.enum(["BUY", "SELL"]).describe("Type of order (BUY or SELL)"),
  }),
    execute: async ({ userId, symbol, quantity, price, orderType }) => {
        try {
            const order = await stockOrders.create({
                userId,
                symbol,
                quantity,
                price,
                orderType: orderType as OrderType,
            });

            return {
                success: true,
                orderId: order.id,
                message: `Successfully created ${orderType} order for ${quantity} shares of ${symbol} at $${price} per share.`
            };
        } catch (error) {
            console.error('Error creating stock order:', error);
            return {
                success: false,
                error: 'Failed to create stock order'
            };
        }
    }
});
We will use the Tavily API for web searches. Let's create a tool for web searches:
// lib/tools/webSearch.ts
import { tool } from "ai";
import { z } from "zod";

export const webSearchTool = tool({
  description: 'Searches the web for information about stocks and financial data',
  parameters: z.object({
    query: z.string().describe('The search query')
  }),
  execute: async ({ query }) => {
    try {
      const API_KEY = process.env.TAVILY_API_KEY;
      const response = await fetch('https://api.tavily.com/search', {
        method: 'POST',
        headers: {
          'Content-Type': 'application/json',
          'Authorization': `Bearer ${API_KEY}`
        },
        body: JSON.stringify({
          query: query
        })
      });

      if (!response.ok) {
        throw new Error(`Search API request failed with status ${response.status}`);
      }

      const data = await response.json();
      return {
        success: true,
        results: data.results
      };
    } catch (error) {
      console.error('Error performing web search:', error);
      return {
        success: false,
        error: 'Failed to perform web search'
      };
    }
  }
});
Now let's create our stock management agent that can use the tools we've created. We'll start with a version that doesn't require human approval for any actions:
// app/api/chat/route.ts
import { openai } from "@ai-sdk/openai";
import { streamText } from "ai";
import {
  createStockOrderTool,
  getCompanyProfileTool,
  getStockQuoteTool,
  webSearchTool,
  getPortfolioPositionsTool,
  getFinancialStatementsTool,
  getBalanceSheetTool,
  getIncomeStatementTool,
  getCashFlowStatementTool
} from "../../../lib/tools";


export async function POST(req: Request) {
  const { messages } = await req.json();

  const result = streamText({
    model: openai("gpt-4o"),
    maxSteps: 10,
    messages,
    system: `
        You are a polite stock advisor assistant who provides advice based on
        the latest stock price, company information and financial results.
        In the confirmation message, include the stock symbol, quantity, and price and current market price.
        All your responses should be in markdown format.
        When you are returning a list of items like position, orders, list of stocks etc, return them in a table format.
    `,
    tools: {
      createStockOrder: createStockOrderTool,
      getCompanyProfile: getCompanyProfileTool,
      getFinancialStatements: getFinancialStatementsTool,
      getBalanceSheet: getBalanceSheetTool,
      getIncomeStatement: getIncomeStatementTool,
      getCashFlowStatement: getCashFlowStatementTool,
      getStockQuote: getStockQuoteTool,
      webSearch: webSearchTool,
      getPortfolioPositions: getPortfolioPositionsTool,
    },
  });

  return result.toDataStreamResponse();
}
Here we are passing all the tools we've created to the AI model.
If the LLM decides to use a tool, it will generate a tool call. Tools with an execute function are run automatically by AI SDK when these calls are generated. The results of the tool calls are returned using tool result objects.
Based on the result of the tool call, the AI model can decide to call another tool or provide the final response.
This can potentially go in an endless loop if tools or prompts are not created properly, so we have set a maxSteps limit to prevent infinite loops.
Middleware in AI SDK allows us to intercept and modify requests and responses between our application and the language model. This is particularly useful for logging, monitoring, and debugging our AI interactions.
Let's create a middleware that logs the input parameters and output of our language model:
// app/lib/util/middleware.ts
import type { LanguageModelV1Middleware, LanguageModelV1StreamPart } from "ai";

export const loggingMiddleware: LanguageModelV1Middleware = {
  wrapGenerate: async ({ doGenerate, params }) => {
    console.log("doGenerate called");
    console.log(`params: ${JSON.stringify(params, null, 2)}`);

    const result = await doGenerate();

    console.log("doGenerate finished");
    console.log(`generated text: ${result.text}`);

    return result;
  },

  wrapStream: async ({ doStream, params }) => {
    console.log("doStream called");
    console.log(`params: ${JSON.stringify(params, null, 2)}`);

    const { stream, ...rest } = await doStream();

    let generatedText = "";

    const transformStream = new TransformStream<
      LanguageModelV1StreamPart,
      LanguageModelV1StreamPart
    >({
      transform(chunk, controller) {
        if (chunk.type === "text-delta") {
          generatedText += chunk.textDelta;
        }

        controller.enqueue(chunk);
      },

      flush() {
        console.log("doStream finished");
        console.log(`generated text: ${generatedText}`);
      },
    });

    return {
      stream: stream.pipeThrough(transformStream),
      ...rest,
    };
  },
};
The middleware has two main functions:
wrapGenerate: Used for non-streaming responses, logs parameters before the call and the generated text after.wrapStream: Used for streaming responses, logs parameters before the call and accumulates text chunks to log the final output.To use this middleware with our agent, we need to modify our API route:
// app/api/chat/route.ts
import { openai } from "@ai-sdk/openai";
import { streamText, wrapLanguageModel } from "ai";
import { loggingMiddleware } from "@/app/lib/util/middleware";
import {
  // ...existing tool imports...
} from "../../../lib/tools";

export async function POST(req: Request) {
  const { messages } = await req.json();

  // Wrap the OpenAI model with our logging middleware
  const wrappedLanguageModel = wrapLanguageModel({
    model: openai("gpt-4o"),
    middleware: loggingMiddleware,
  });

  const result = streamText({
    model: wrappedLanguageModel,  // Use the wrapped model instead of directly using openai("gpt-4o")
    maxSteps: 10,
    messages,
    system: `
        // ...existing system prompt...
    `,
    tools: {
      // ...existing tools...
    },
  });

  return result.toDataStreamResponse();
}
You can create more sophisticated middleware for:
Let us first get the latest price of a stock:
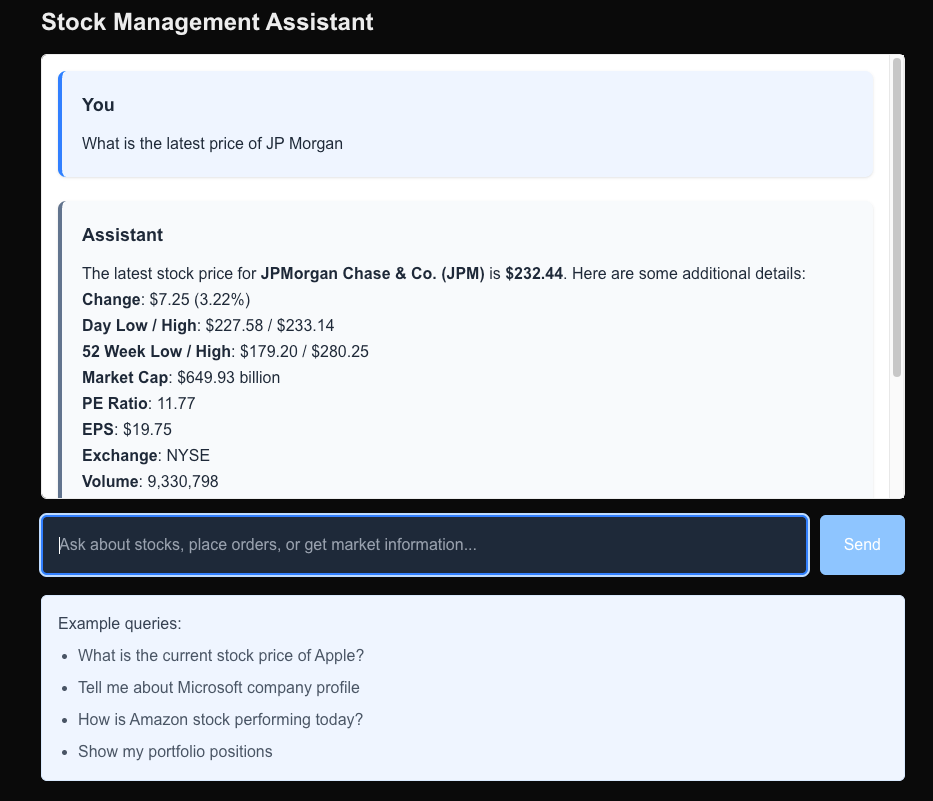
Now let us check the logs and understand the flow :
1. First LLM called passing the tools and prompt:

doStream called
params: {
  "mode": {
    "type": "regular",
    "tools": [
      {
        "type": "function",
        "name": "getStockQuote",
        "description": "Gets current stock quote information for a symbol",
        "parameters": {
          "type": "object",
          "properties": {
            "symbol": {
              "type": "string",
              "description": "Stock symbol (e.g., AAPL, MSFT)"
            }
          },
          "required": [
            "symbol"
          ],
          "additionalProperties": false,
          "$schema": "http://json-schema.org/draft-07/schema#"
        }
      },
      // Other tools...
    ],
    "toolChoice": {
      "type": "auto"
    }
  },
  "temperature": 0,
  "inputFormat": "messages",
  "prompt": [
    {
      "role": "system",
      "content": "\n        You are a polite stock advisor assistant who provides structured responses based on \n        the latest stock price, company information and financial results.\n        All your responses should be in markdown format.\n    "
    },
    {
      "role": "user",
      "content": [
        {
          "type": "text",
          "text": "What is the latest price of JP Morgan"
        }
      ]
    }
  ]
}


2. LLM responded with the tool call which means tool to be executed:


3. Tool is executed by AI SDK and response is sent back to LLM:

params: {
  "mode": {
    "type": "regular",
    "tools": [
      {
        "type": "function",
        "name": "getStockQuote",
        "description": "Gets current stock quote information for a symbol",
        "parameters": {
          "type": "object",
          "properties": {
            "symbol": {
              "type": "string",
              "description": "Stock symbol (e.g., AAPL, MSFT)"
            }
          },
          "required": [
            "symbol"
          ],
          "additionalProperties": false,
          "$schema": "http://json-schema.org/draft-07/schema#"
        }
      },
      // Other tools...
    ],
    "toolChoice": {
      "type": "auto"
    }
  },
  "temperature": 0,
  "inputFormat": "messages",
  "prompt": [
    {
      "role": "system",
      "content": "\n        You are a polite stock advisor assistant who provides structured responses based on \n        the latest stock price, company information and financial results.\n        All your responses should be in markdown format.\n    "
    },
    {
      "role": "user",
      "content": [
        {
          "type": "text",
          "text": "What is the latest price of JP Morgan"
        }
      ]
    },
    {
      "role": "assistant",
      "content": [
        {
          "type": "tool-call",
          "toolCallId": "call_pSocXguA6nK3GlDSDuEAzlRQ",
          "toolName": "getStockQuote",
          "args": {
            "symbol": "JPM"
          }
        }
      ]
    },
    {
      "role": "tool",
      "content": [
        {
          "type": "tool-result",
          "toolCallId": "call_pSocXguA6nK3GlDSDuEAzlRQ",
          "toolName": "getStockQuote",
          "result": {
            "success": true,
            "data": {
              "symbol": "JPM",
              "name": "JPMorgan Chase & Co.",
              "price": 232.44,
              "changesPercentage": 3.2195,
              "change": 7.25,
              "dayLow": 227.58,
              "dayHigh": 233.143,
              "yearHigh": 280.25,
              "yearLow": 179.2,
              "marketCap": 649927808400,
              "priceAvg50": 257.3592,
              "priceAvg200": 227.6351,
              "exchange": "NYSE",
              "volume": 9330798,
              "avgVolume": 10213025,
              "open": 228.12,
              "previousClose": 225.19,
              "eps": 19.75,
              "pe": 11.77,
              "earningsAnnouncement": "2025-04-11T12:30:00.000+0000",
              "sharesOutstanding": 2796110000,
              "timestamp": 1741982402
            }
          }
        }
      ]
    }
  ]
}

4. LLM generated the response:


generated text: The latest stock price for **JPMorgan Chase & Co. (JPM)** is **$232.44**. Here are some additional details:

- **Change**: $7.25 (3.22%)
- **Day Low / High**: $227.58 / $233.14
- **52 Week Low / High**: $179.20 / $280.25
- **Market Cap**: $649.93 billion
- **PE Ratio**: 11.77
- **EPS**: $19.75
- **Exchange**: NYSE
- **Volume**: 9,330,798
- **Average Volume**: 10,213,025
- **Previous Close**: $225.19
- **Open**: $228.12

Please let me know if you need more information!
For critical operations like placing stock orders, we might want to add human approval. Let's create a tool and API route that implements this pattern:
// lib/tools/createStockOrder.ts (additional tool)
export const createStockOrderToolWithConfirmation = tool({
  description:
    "Creates a new stock order (BUY or SELL) for a specified stock symbol with human confirmation",
  parameters: z.object({
    userId: z.string().describe("User ID making the order"),
    symbol: z.string().describe("Stock symbol (e.g., AAPL, MSFT)"),
    quantity: z
      .number()
      .int()
      .positive()
      .describe("Number of shares to buy or sell"),
    price: z.number().positive().describe("Price per share"),
    orderType: z.enum(["BUY", "SELL"]).describe("Type of order (BUY or SELL)"),
  }),
  // No execute function here - will require human confirmation
});
We will remove the execute function for tools requiring confirmation and pass that separately to the agent.
// lib/utils.ts
import { formatDataStreamPart, Message } from '@ai-sdk/ui-utils';
import {
  convertToCoreMessages,
  DataStreamWriter,
  ToolExecutionOptions,
  ToolSet,
} from 'ai';
import { z } from 'zod';

// Approval string to be shared across frontend and backend
export const APPROVAL = {
  YES: 'Yes, confirmed.',
  NO: 'No, denied.',
} as const;

function isValidToolName<K extends PropertyKey, T extends object>(
  key: K,
  obj: T,
): key is K & keyof T {
  return key in obj;
}

/**
 * Processes tool invocations where human input is required, executing tools when authorized.
 *
 * @param options - The function options
 * @param options.tools - Map of tool names to Tool instances that may expose execute functions
 * @param options.dataStream - Data stream for sending results back to the client
 * @param options.messages - Array of messages to process
 * @param executionFunctions - Map of tool names to execute functions
 * @returns Promise resolving to the processed messages
 */
export async function processToolCalls<
  Tools extends ToolSet,
  ExecutableTools extends {
    [Tool in keyof Tools as Tools[Tool] extends { execute: Function }
      ? never
      : Tool]: Tools[Tool];
  },
>(
  {
    dataStream,
    messages,
  }: {
    tools: Tools; // used for type inference
    dataStream: DataStreamWriter;
    messages: Message[];
  },
  executeFunctions: {
    [K in keyof Tools & keyof ExecutableTools]?: (
      args: z.infer<ExecutableTools[K]['parameters']>,
      context: ToolExecutionOptions,
    ) => Promise<any>;
  },
): Promise<Message[]> {
  const lastMessage = messages[messages.length - 1];
  const parts = lastMessage.parts;
  if (!parts) return messages;

  const processedParts = await Promise.all(
    parts.map(async part => {
      // Only process tool invocations parts
      if (part.type !== 'tool-invocation') return part;

      const { toolInvocation } = part;
      const toolName = toolInvocation.toolName;

      // Only continue if we have an execute function for the tool (meaning it requires confirmation) and it's in a 'result' state
      if (!(toolName in executeFunctions) || toolInvocation.state !== 'result')
        return part;

      let result;

      if (toolInvocation.result === APPROVAL.YES) {
        // Get the tool and check if the tool has an execute function.
        if (
          !isValidToolName(toolName, executeFunctions) ||
          toolInvocation.state !== 'result'
        ) {
          return part;
        }

        const toolInstance = executeFunctions[toolName];
        if (toolInstance) {
          result = await toolInstance(toolInvocation.args, {
            messages: convertToCoreMessages(messages),
            toolCallId: toolInvocation.toolCallId,
          });
        } else {
          result = 'Error: No execute function found on tool';
        }
      } else if (toolInvocation.result === APPROVAL.NO) {
        result = 'Error: User denied access to tool execution';
      } else {
        // For any unhandled responses, return the original part.
        return part;
      }

      // Forward updated tool result to the client.
      dataStream.write(
        formatDataStreamPart('tool_result', {
          toolCallId: toolInvocation.toolCallId,
          result,
        }),
      );

      // Return updated toolInvocation with the actual result.
      return {
        ...part,
        toolInvocation: {
          ...toolInvocation,
          result,
        },
      };
    }),
  );

  // Finally return the processed messages
  return [...messages.slice(0, -1), { ...lastMessage, parts: processedParts }];
}

export function getToolsRequiringConfirmation<T extends ToolSet>(
  tools: T,
): string[] {
  return (Object.keys(tools) as (keyof T)[]).filter(key => {
    const maybeTool = tools[key];
    return typeof maybeTool.execute !== 'function';
  }) as string[];
}
This basically processes the tool calls and executes the tool functions if the user confirms the action. If the user denies the action, it returns an error message.
processToolCalls processes the tool invocations in the messages array, executing the tool functions when authorized.
It takes the last message in the array and checks if it has a tool invocation part.
If the tool invocation requires confirmation, it checks if the user has confirmed the action.
If the user has confirmed, it executes the tool function and returns the result as part of the message. If user has denied, it returns an error message.
All other parts are returned as is.
// app/api/chat-hil/route.ts
const tools = {
  createStockOrderWithConfirmation: createStockOrderToolWithConfirmation,
  getCompanyProfile: getCompanyProfileTool,
  getStockQuote: getStockQuoteTool,
  webSearch: webSearchTool,
  getPortfolioPositions: getPortfolioPositionsTool,
  getFinancialStatements: getFinancialStatementsTool,
  getBalanceSheet: getBalanceSheetTool,
  getIncomeStatement: getIncomeStatementTool,
  getCashFlowStatement: getCashFlowStatementTool,
};

export async function POST(req: Request) {
  const { messages } = await req.json();

  return createDataStreamResponse({
    execute: async dataStream => {
      // Process messages for any tool calls that require human confirmation
      const processedMessages = await processToolCalls(
        {
          messages,
          dataStream,
          tools,
        },
        {
          // Implementation for createStockOrderWithConfirmation
          createStockOrderWithConfirmation: async ({ userId, symbol, quantity, price, orderType }) => {
            try {
              const order = await stockOrders.create({
                userId,
                symbol,
                quantity,
                price,
                orderType: orderType as OrderType,
              });

              return {
                success: true,
                orderId: order.id,
                message: `Successfully created ${orderType} order for ${quantity} shares of ${symbol} at $${price} per share.`,
              };
            } catch (error) {
              console.error("Error creating stock order:", error);
              return {
                success: false,
                error: "Failed to create stock order"
              };
            }
          },
        },
      );

      const result = streamText({
        model: openai("gpt-4o"),
        maxSteps: 10,
        messages: processedMessages,
        system: `
          You are a polite stock advisor assistant who provides advice based on
          the latest stock price, company information and financial results.
          When suggesting a stock order, always use createStockOrderWithConfirmation tool.
          All your responses should be in markdown format.
          When you are returning a list of items like position, orders, list of stocks etc, return them in a table format.
        `,
        tools,
      });

      result.mergeIntoDataStream(dataStream);
    },
  });
}
Here we are calling the processToolCalls passing the messages and tool implementation for which human confirmation is required. Post processing the messages, we are passing it to the AI model for generating the response.
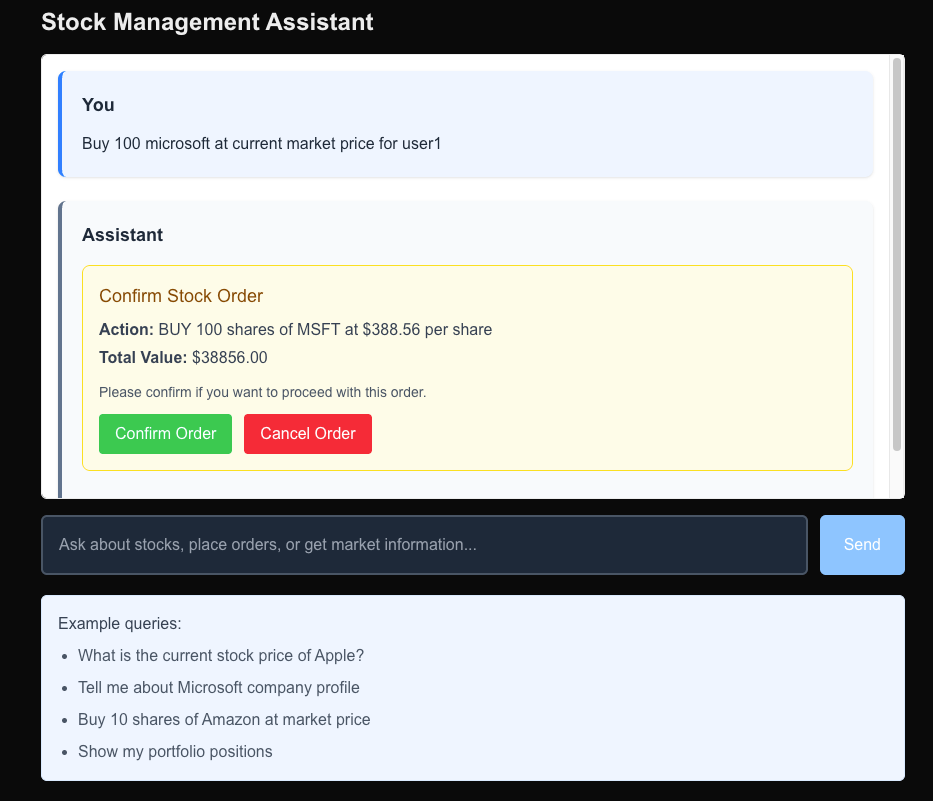
Now let's create a UI component that supports human approval:
// app/hil/page.tsx
"use client";

import { useState } from "react";
import { useChat } from "@ai-sdk/react";
import ReactMarkdown from 'react-markdown';
import { APPROVAL, getToolsRequiringConfirmation } from '../../lib/utils';

export default function Chat() {
  const {
    messages,
    input,
    handleInputChange,
    handleSubmit,
    status,
    addToolResult
  } = useChat({
    api: "/api/chat-hil"
  });

  const isLoading = status === "submitted";

  const tools = {
    createStockOrderWithConfirmation: {}, // Simplified for this example
    getCompanyProfile: {},
    getStockQuote: {},
    webSearch: {},
    getPortfolioPositions: {},
  };

  const toolsRequiringConfirmation = getToolsRequiringConfirmation(tools);

  // Check if there's a pending tool confirmation
  const pendingToolCallConfirmation = messages.some(m =>
    m.parts?.some(
      part =>
        part.type === 'tool-invocation' &&
        part.toolInvocation.state === 'call' &&
        toolsRequiringConfirmation.includes(part.toolInvocation.toolName),
    ),
  );

  return (
    <div className="flex flex-col w-full max-w-4xl mx-auto p-4 h-[90vh]">
      <h1 className="text-2xl font-bold mb-4">Stock Management Assistant (with Human-in-the-Loop)</h1>

      <div className="flex-1 overflow-y-auto mb-4 border rounded-md p-4 bg-white">
        {messages.length === 0 && (
          <div className="text-gray-400 text-center py-8 text-lg">
            Start a conversation to get stock information and trading assistance
          </div>
        )}

        {messages.map((message, index) => (
          <div
            key={message.id || index}
            className={`mb-6 p-5 rounded-lg shadow-sm ${
              message.role === "user"
                ? "bg-blue-50 border-l-4 border-blue-500"
                : "bg-slate-50 border-l-4 border-slate-500"
            }`}
          >
            <div className="font-bold mb-3 text-gray-800 text-lg">
              {message.role === "user" ? "You" : "Assistant"}
            </div>

            <div className="text-gray-800 prose prose-slate max-w-none">
              {message.parts?.map((part, partIndex) => {
                switch (part.type) {
                  case "text":
                    return (
                      <div key={partIndex} className="text-base leading-relaxed">
                        <ReactMarkdown>
                          {part.text}
                        </ReactMarkdown>
                      </div>
                    );
                  case "tool-invocation":
                    const toolInvocation = part.toolInvocation;
                    const toolCallId = toolInvocation.toolCallId;

                    // Handle confirmation for tools that require it
                    if (
                      toolsRequiringConfirmation.includes(toolInvocation.toolName) &&
                      toolInvocation.state === 'call'
                    ) {
                      const { symbol, quantity, price, orderType } = toolInvocation.args;

                      return (
                        <div key={partIndex} className="my-4 p-4 bg-yellow-50 border border-yellow-300 rounded-lg">
                          <h4 className="text-lg font-medium text-yellow-800 mb-2">Confirm Stock Order</h4>
                          <div className="mb-3">
                            <p className="text-gray-700">
                              <strong>Action:</strong> {orderType} {quantity} shares of {symbol} at ${price} per share
                            </p>
                            <p className="text-gray-700 mt-1">
                              <strong>Total Value:</strong> ${(quantity * price).toFixed(2)}
                            </p>
                          </div>
                          <p className="text-sm text-gray-600 mb-3">
                            Please confirm if you want to proceed with this order.
                          </p>
                          <div className="flex gap-3">
                            <button
                              className="px-4 py-2 bg-green-500 text-white rounded hover:bg-green-600 transition-colors"
                              onClick={() =>
                                addToolResult({
                                  toolCallId,
                                  result: APPROVAL.YES,
                                })
                              }
                            >
                              Confirm Order
                            </button>
                            <button
                              className="px-4 py-2 bg-red-500 text-white rounded hover:bg-red-600 transition-colors"
                              onClick={() =>
                                addToolResult({
                                  toolCallId,
                                  result: APPROVAL.NO,
                                })
                              }
                            >
                              Cancel Order
                            </button>
                          </div>
                        </div>
                      );
                    }
                    return null;
                  default:
                    return null;
                }
              })}
            </div>
          </div>
        ))}
        {isLoading && (
          <div className="flex items-center space-x-2 p-4 bg-gray-50 rounded-lg">
            <div className="animate-pulse flex space-x-1">
              <div className="h-3 w-3 bg-blue-400 rounded-full"></div>
              <div className="h-3 w-3 bg-blue-400 rounded-full"></div>
              <div className="h-3 w-3 bg-blue-400 rounded-full"></div>
            </div>
            <div className="text-gray-600 font-medium">Assistant is thinking...</div>
          </div>
        )}
      </div>

      <form onSubmit={handleSubmit} className="flex gap-3">
        <input
          type="text"
          value={input}
          onChange={handleInputChange}
          placeholder="Ask about stocks, place orders, or get market information..."
          className="flex-1 p-4 text-base text-gray-800 border-2 border-gray-300 rounded-md"
          disabled={pendingToolCallConfirmation}
        />
        <button
          type="submit"
          disabled={isLoading || !input.trim() || pendingToolCallConfirmation}
          className="px-6 py-3 bg-blue-500 hover:bg-blue-600 text-white font-medium rounded-md disabled:bg-blue-300"
        >
          {isLoading ? 'Sending...' : 'Send'}
        </button>
      </form>
    </div>
  );
}
Here we are checking if the tool invocation requires confirmation and displaying a confirmation dialog to the user. The user can confirm or deny the action, and then the result is added to tool results.
Now let's test the agent with human-in-the-loop functionality. You can see the screenshot from my testing below.
In this guide, we've built a comprehensive stock management agent using Next.js, the AI SDK, and OpenAI.
To stay updated with the latest updates in Java and Spring follow us on linked in and medium.
You can find the code used in this blog here
Learn how to set up a powerful, free AI code assistant in VS Code and IntelliJ IDEA using Ollama and Continue plugin. This guide will help you enhance your coding experience with local AI models, providing intelligent code suggestions without relying on cloud services.
Complete guide to HTTP protocol evolution. Compare HTTP/0.9, HTTP/1.0, HTTP/1.1, HTTP/2, and HTTP/3 with improvements and use cases.
Find the most popular YouTube creators in tech categories like AI, Java, JavaScript, Python, .NET, and developer conferences. Perfect for learning, inspiration, and staying updated with the best tech content.
Get instant AI-powered summaries of YouTube videos and websites. Save time while enhancing your learning experience.
