Model Context Protocol (MCP) is a major buzzword in the AI world these days. MCP is an open protocol designed to standardize how applications deliver context to LLMs. Imagine MCP as the USB-C port for AI applications: just as USB-C offers a universal way to connect devices to a wide range of peripherals, MCP enables a consistent and flexible method for linking AI models with diverse data sources and tools.
Before we jump into the details of MCP, let's take a step back and understand how we used to build AI applications before Anthropic introduced MCP.
An AI agent is essentially an LLM with extended capabilities through three key components that allow it to overcome the limitations and interact with the external world:
Retrieval: Enables the LLM to query external knowledge bases, documents, or databases to access information beyond its training data. This creates a more up-to-date and accurate response system.
Tools: Allows the LLM to interact with external systems, APIs, databases, web services, file systems, external devices etc. Tools give the model the ability to perform actions like searching the web, running code, accessing specialized databases, or controlling other applications.
Memory: Provides persistence across interactions, allowing the agent to remember past conversations and maintain context over time. This creates more coherent, consistent experiences for users.
These components work together to transform a static LLM into a dynamic agent that can access information, perform actions in the external world, and maintain contextual awareness throughout interactions.
Before Anthropic came with the idea of the Model Context Protocol, most of the agent applications were using separate custom tools, prompts and data access which was closely coupled with the code. There was no standard way to share these which meant there was too much of duplicate work even within the same organization.
This led to:
MCP addresses the duplication problem by providing a standardized protocol that enables sharing and reuse of tools, prompts, and retrieval systems across different AI agents. This allows teams to build common tools in MCP servers and then use them across many applications, significantly reducing development time and effort.
MCP transforms the fragmented AI development landscape by providing a standardized protocol that enables component sharing across applications. Here's how it solves the key problems:
Standardized Prompt Management: Instead of each application implementing custom prompts, MCP establishes shared prompts that can be accessed by all AI agents, ensuring consistent behavior and eliminating duplicate prompt engineering efforts.
Unified Retrieval Systems: MCP allows multiple agents to access the same resources and retrieval services, providing standardized access to knowledge bases and data sources. Teams no longer need to build separate retrieval implementations.
Shared Tool Ecosystem: Common tools like code execution, API integrations, and data processing capabilities can be developed once and accessed through the MCP protocol by any agent. This creates a rich ecosystem of reusable components. Ever since the introduction of MCP, open-source communities have started building a lot of tools and resources that can be used with MCP.
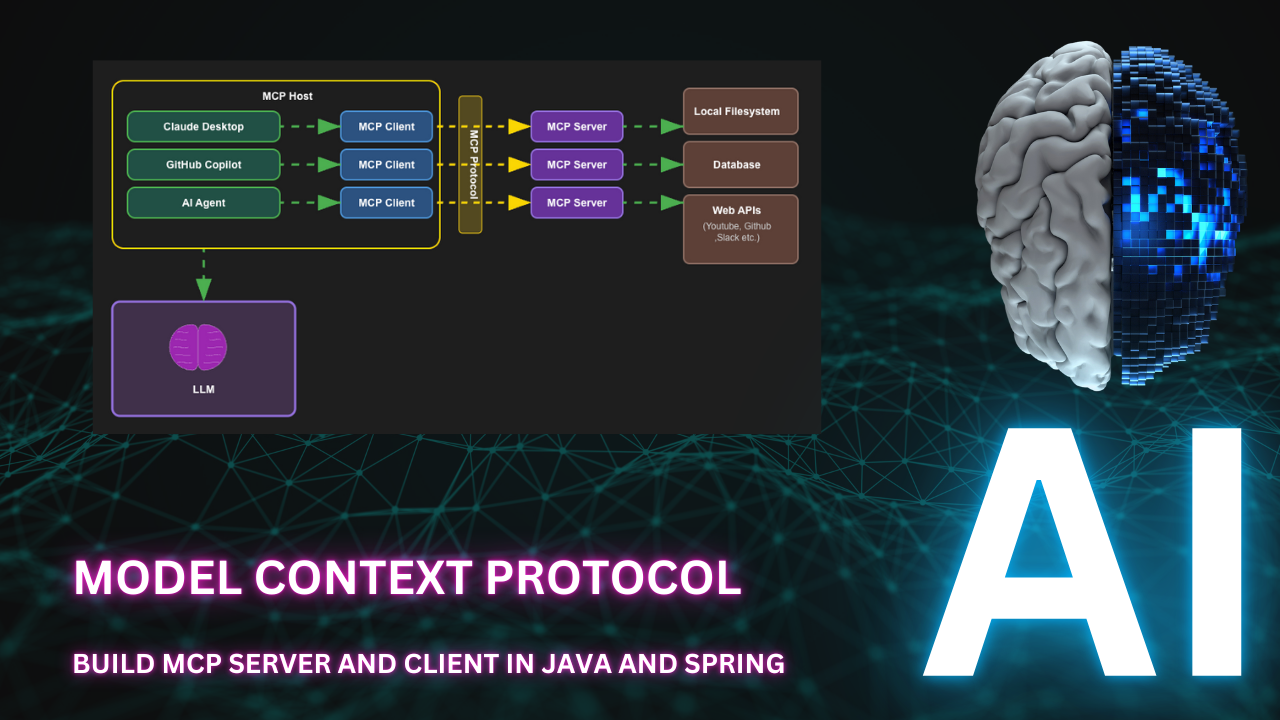
Below are the key components of the MCP architecture:
MCP client communicates with the MCP server using JSON-RPC 2.0, a lightweight remote procedure call (RPC) protocol. This allows for easy integration and communication between different components of the architecture.
HTTP with SSE is now getting replaced with Streamable HTTP and there are some implementations already.
The MCP connection lifecycle follows a structured protocol:
1. The MCP host reads its configuration file to determine which MCP servers to connect to.
2. The host sends an initialize request to the MCP server, including protocol version and capabilities.
3. The server responds with an initialize response containing its protocol version and available capabilities - tools, data endpoints, and supported actions.
4. The host acknowledges with an initialized notification, completing the handshake.
5. The connection becomes ready for use, establishing a communication channel for the duration of the session.
6. The host presents the discovered capabilities to the AI model, expanding its available functions.
7. The connection remains open persistently throughout the agent's session, supporting stateful interactions.
8. When the session ends, the host gracefully closes the connection.
There are 2 options to create an MCP server in Java:
In this post, we will use Spring AI MCP.
First we will build an MCP server for youtube search and transcript and integrate it with MCP host like Claude Desktop or Github Copilot in VSCode.
Then we will create an MCP client as part of Learning Assistant AI agent and integrate our youtube MCP server with it. Also we will integrate some open source MCP servers available like local filesystem, web search etc.
Let us head to Spring Initializr and create a new Spring Boot project with the following dependencies:
If you just want stdio transport, you will not need to add Spring Web dependency.
First we will create a common component for invoking the Youtube Data API. This will be used by other components like YoutubeSearchService.
@Service
public class YoutubeApiClient {
    private static final Logger logger = LoggerFactory.getLogger(YoutubeApiClient.class);
    private final String apiKey;
    private final RestClient restClient;
    private static final String API_BASE_URL = "https://www.googleapis.com/youtube/v3";

    public YoutubeApiClient(@Value("${youtube.api.key}") String apiKey) {
        this.apiKey = apiKey;
        this.restClient = RestClient.builder().build();
    }

    public String get(String endpoint, Map<String, Object> params) {
        UriComponentsBuilder builder = UriComponentsBuilder.fromHttpUrl(API_BASE_URL + endpoint)
                .queryParam("key", apiKey);
        if (params != null) {
            params.forEach(builder::queryParam);
        }
        String url = builder.toUriString();
        logger.info("[YoutubeApiClient] Sending GET request: {}", url);
        ResponseEntity<String> response = restClient.get().uri(url).retrieve().toEntity(String.class);
        logger.info("[YoutubeApiClient] Response: {}", response.getBody());
        return response.getBody();
    }
}
Here we are using RestClient to make the API calls to Youtube Data API. Along with the parameters we are also passing the API key as a query parameter.
Now let us add the below entries to application.properties file:
spring.application.name=youtube-mcp

youtube.api.key=${YOUTUBE_API_KEY}

# For integration using stdio enable the below
#spring.ai.mcp.server.stdio=true
#spring.main.banner-mode=off
#logging.pattern.console=
#logging.file.name=youtube-mcp-spring.log
You can get the API key from Google Cloud Console and set the YOUTUBE_API_KEY environment variable to your Youtube Data API key.
Now let us add a YoutubeVideoSearchService component which will use the YoutubeApiClient to search for videos.
Also we will add a @Tool annotation to this component which will be used by the MCP server to expose this functionality as tool.
@Service
public class YoutubeVideoSearchService {
    private final YoutubeApiClient apiClient;

    public YoutubeVideoSearchService(YoutubeApiClient apiClient) {
        this.apiClient = apiClient;
    }

    @Tool(
        name = "youtube_search",
        description = "Search for videos on YouTube using a query string."
    )
    public String searchVideos(String query, int maxResults) {
        Map<String, Object> params = new HashMap<>();
        params.put("part", "snippet");
        params.put("q", query);
        params.put("maxResults", maxResults);
        return apiClient.get("/search", params);
    }
}
Similarly we can add other components to call other Youtube Data API endpoints following the same approach. You can find the code for those here youtube-mcp-server.
For the transcript service we will use a JavaScript library youtube-transcript.
Let us create a JavaScript file transcript.js and add the following code:
const { YoutubeTranscript } = require('youtube-transcript'); async function main() { const videoId = process.argv[2]; if (!videoId) { console.log(JSON.stringify({ error: 'Usage: node get_transcript.js <videoId>' })); process.exit(1); } try { const transcript = await YoutubeTranscript.fetchTranscript(videoId); console.log(`# Transcript for YouTube Video: ${videoId}\n`); transcript.forEach((entry, index) => { const cleanText = entry.text.replace(/&#39;/g, "'").replace(/&#34;/g, '"'); const timestamp = formatTimestamp(entry.offset); console.log(`[${timestamp}] : ${cleanText}`); }); } catch (error) { console.log(JSON.stringify({ error: error.message })); } } function formatTimestamp(seconds) { const mins = Math.floor(seconds / 60); const secs = Math.floor(seconds % 60); return `${mins}:${secs.toString().padStart(2, '0')}`; } main();
Also initialize the JavaScript project and install the youtube-transcript library.
npm init -y
npm install youtube-transcript
Now we will create a YoutubeTranscriptionService component which will use the above JavaScript file to get the transcript for a video.
@Service
public class YoutubeTranscriptionService {

    @Tool(
            name = "youtube_transcript",
            description = "Get transcript for a YouTube video by video ID."
    )
    public String getTranscript(String videoId) {
        try {
            ProcessBuilder pb = new ProcessBuilder(
                "node", "get_transcript.js", videoId
            );
            pb.redirectErrorStream(true);
            Process process = pb.start();
            try (BufferedReader reader = new BufferedReader(new InputStreamReader(process.getInputStream()))) {
                String output = reader.lines().collect(Collectors.joining("\n"));
                int exitCode = process.waitFor();
                return output;
            }
        } catch (Exception e) {
            return "{\"error\": \"" + e.getMessage().replace("\"", "'") + "\"}";
        }
    }
}
Now we have all the tools, let us expose them in our MCP server. For that we just need to add a @ToolCallbackProvider bean and add all the tools to it.
@SpringBootApplication
public class YoutubeMcpApplication {

    public static void main(String[] args) {
        SpringApplication.run(YoutubeMcpApplication.class, args);
    }

    @Bean
    public ToolCallbackProvider youtubeToolsCallbackProvider(
            YoutubeActivitiesService youtubeActivitiesService,
            YoutubeChannelService youtubeChannelService,
            YoutubeCommentsService youtubeCommentsService,
            YoutubeMetaService youtubeMetaService,
            YoutubePlaylistItemsService youtubePlaylistItemsService,
            YoutubePlaylistService youtubePlaylistService,
            YoutubeThumbnailsService youtubeThumbnailsService,
            YoutubeVideoDetailsService youtubeVideoDetailsService,
            YoutubeVideoSearchService youtubeVideoSearchService,
            YoutubeChannelSectionsService youtubeChannelSectionsService,
            YoutubeTranscriptionService youtubeTranscriptionService
    ) {
        var toolCallbackProvider = MethodToolCallbackProvider.builder()
                .toolObjects(
                        youtubeVideoSearchService,
                        youtubeTranscriptionService,
                        youtubeActivitiesService,
                        youtubeChannelService,
                        youtubeCommentsService,
                        youtubeMetaService,
                        youtubePlaylistItemsService,
                        youtubePlaylistService,
                        youtubeThumbnailsService,
                        youtubeVideoDetailsService,
                        youtubeChannelSectionsService
                )
                .build();
        return toolCallbackProvider;
    }
}
Now we can start our MCP server.
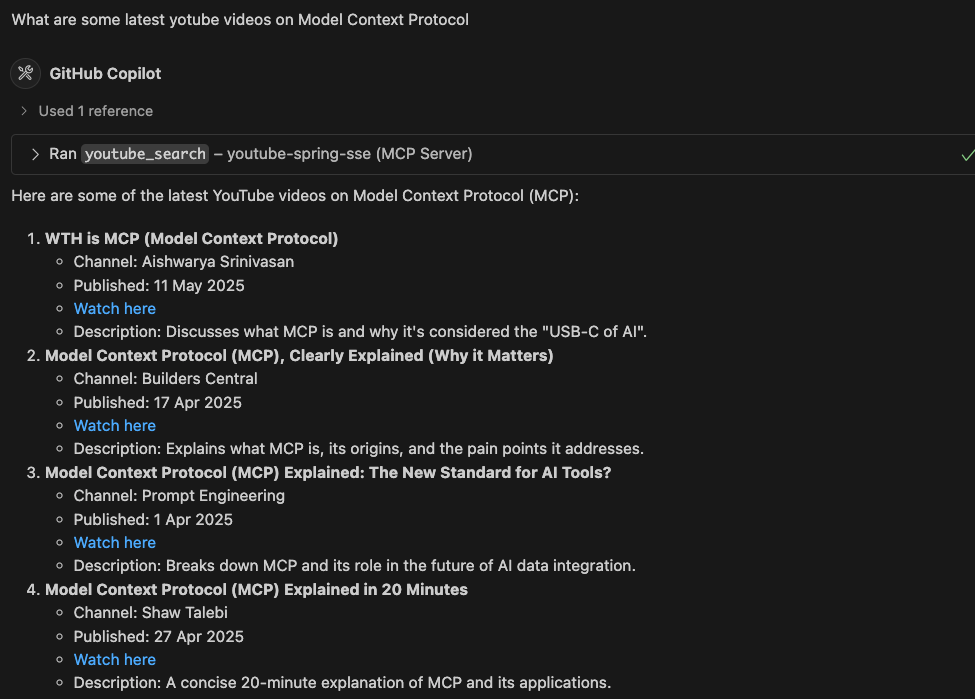
You can test it from any MCP host like Claude Desktop or Github Copilot in VSCode.
In VSCode, we can add the below configuration in settings.json file to connect to the MCP servers.
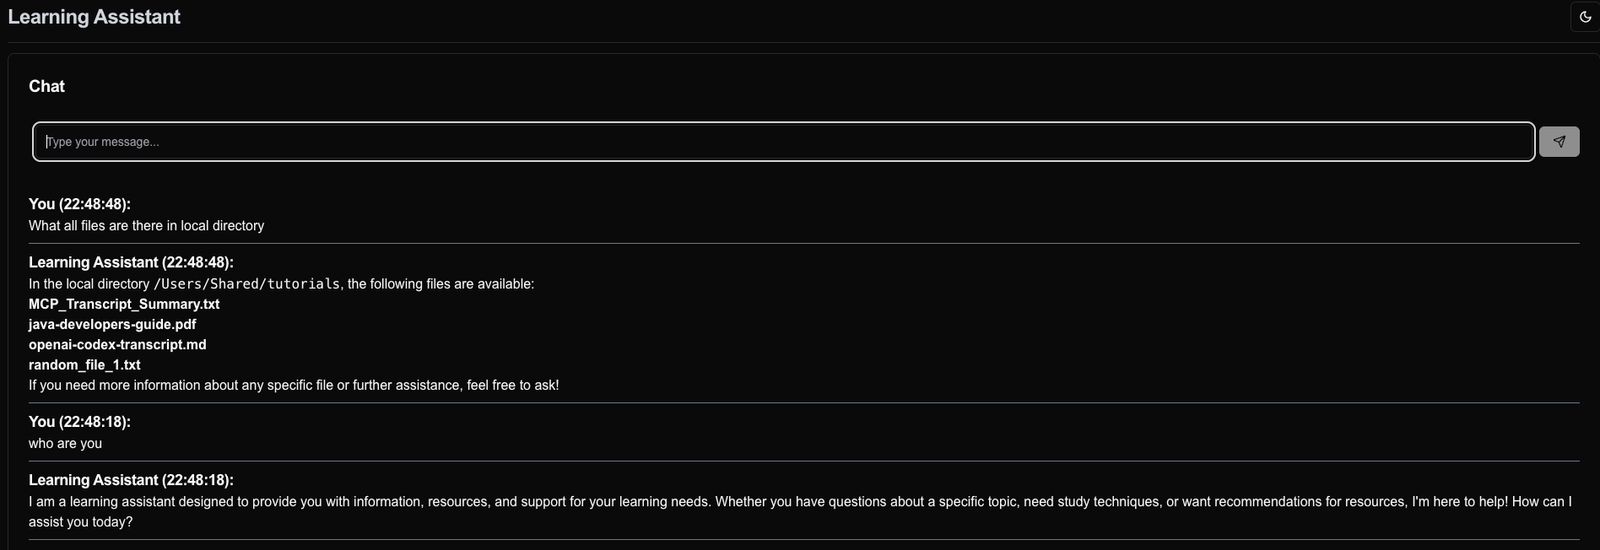
    "mcp": {
        "servers": {
            "filesystem": {
                "type": "stdio",
                "command": "npx",
                "args": [
                    "-y",
                    "@modelcontextprotocol/server-filesystem",
                    "/Users/Shared/tutorials"
                ]
            },
            "brave-search": {
                "type": "stdio",
                "command": "docker",
                "args": ["run", "-i", "--rm", "-e", "BRAVE_API_KEY", "mcp/brave-search"],
                "env": {
                    "BRAVE_API_KEY": "api key"
                }
            },
            "youtube-spring-sse": {
                "type": "sse",
                "url": "http://localhost:8080/sse"
            },
        },
    }
Here we are adding 3 MCP servers:
BRAVE_API_KEY environment variable to your Brave Search API key.Now Github Copilot will be able to use these servers to search for files, web pages and youtube videos.
I have also built this as a docker image and published in docker hub. You can run it using the following command:
docker run -e YOUTUBE_API_KEY=<your_api_key_here> -p 8085:8080 codewizard01/youtube-mcp:latest
This will start the MCP server on port 8085.
You can also run the MCP server using stdio transport. For that you need to add the below configuration in application.properties file:
spring.ai.mcp.server.stdio=true
spring.main.banner-mode=off
logging.pattern.console=
logging.file.name=youtube-mcp-spring.log
Then you can export the jar file for youtube-mcp-server application and add the below to the mcp configuration in settings.json file:
    "mcp": {
        "servers": {
            "youtube-spring-stdio": {
                "type": "stdio",
                "command": "java",
                "args": [
                    "-jar",
                    "/path/to/youtube-mcp-server.jar"
                ],
                "env": {
                    "YOUTUBE_API_KEY": "<your_api_key_here>"
                }
            }
        }
    }
Now let us build a Learning Assistant AI agent which will use the Youtube MCP server we created above.
Let us first initialize a new Spring Boot project with the following dependencies:
We will add the below configuration to application.yml file to enable MCP client and configure the MCP servers.
spring:
  ai:
    mcp:
      client:
        toolcallback:
          enabled: true
        stdio:
          servers-configuration: classpath:mcp-servers.json
        sse:
          connections:
            youtube-mcp:
            url: http://localhost:8080
Also we will add a mcp-servers.json file in src/main/resources folder to add all stdio based MCP servers here.
{
  "mcpServers": {
    "filesystem": {
      "command": "npx",
      "args": [
        "-y",
        "@modelcontextprotocol/server-filesystem",
        "/Users/Shared/tutorials"
      ]
    },
    "brave-search": {
      "command": "docker",
      "args": ["run", "-i", "--rm", "-e", "BRAVE_API_KEY", "mcp/brave-search"],
      "env": {
        "BRAVE_API_KEY": "api key"
      }
    }
  }
}
Now let us add a LearningAssistantService which will plugin the MCP servers to OpenAI API.
@Service
public class LearningAssistantService {

    private final ChatClient chatClient;

    public LearningAssistantService(ChatClient.Builder chatClientBuilder, ChatMemory chatMemory,List<McpSyncClient> mcpSyncClients) {
        this.chatClient = chatClientBuilder
                .defaultAdvisors(MessageChatMemoryAdvisor.builder(chatMemory).build(),
                        new SimpleLoggerAdvisor())
                .defaultToolCallbacks(new SyncMcpToolCallbackProvider(mcpSyncClients))
                .defaultSystem("""
                        You are a learning assistant. Provide advice based on the user's message.
                        You can suggest resources, study techniques, or any other relevant information.
                        Use the tools provided to get latest information.
                        All your responses should be in markdown format.
                        """)
                .build();
    }


    public String advice(String userMessage) {
        return chatClient.prompt()
                .user(userMessage)
                .call()
                .content();
    }
}
In the above code first we are creating a ChatClient with the below configuration:
MessageChatMemoryAdvisor to keep the chat history and SimpleLoggerAdvisor to log the LLM call and response.SyncMcpToolCallbackProvider to pass all MCP clients available. This will give access to all the tools available in the MCP servers.Then we are using the chatClient to send the user message and get the response.
Now let us add a controller to expose the Learning Assistant service as a REST API.
@RestController
@RequestMapping("/chat")
public class ChatController {

    private final LearningAssistantService assistant;

    public ChatController(LearningAssistantService assistant) {
        this.assistant = assistant;
    }

    @GetMapping
    public String chat(String userMessage) {
        return assistant.advice(userMessage);
    }
}
Now we can run the application, and it will start the Learning Assistant service on port 8080.
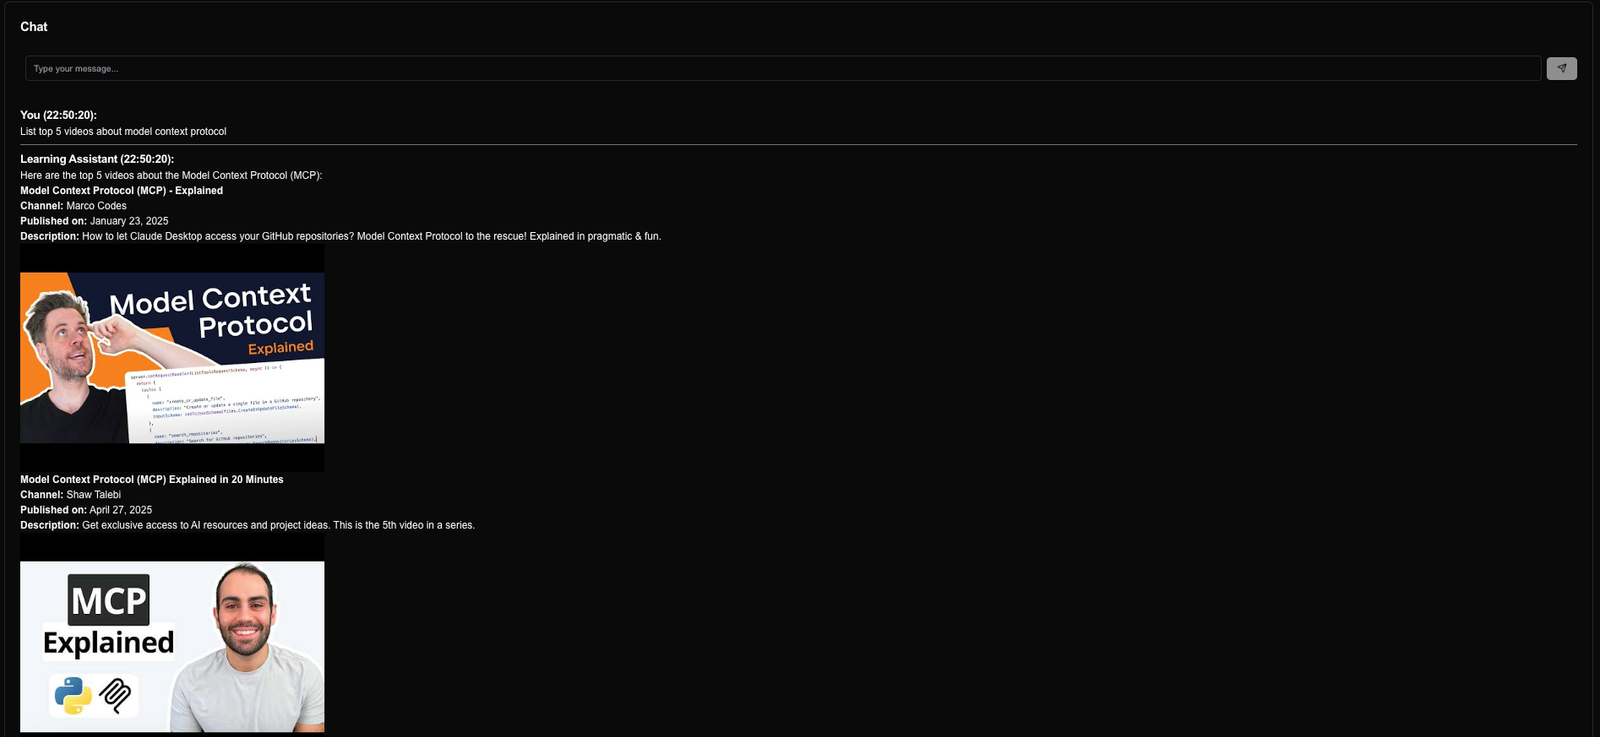
We can test the Learning Assistant service using any REST client like Postman, curl or httpie. But I have created a simple UI using NextJS which you can find here learning-assistant-ui.
Below are some screenshots from my testing:
In this video, we explored the Model Context Protocol (MCP) and its connection lifecycle. We built an MCP server for YouTube search and transcript using Spring AI, and integrated it with VS Code and a Learning Assistant AI agent.
You can find the code for the MCP server and the learning assistant with MCP client on my GitHub repository.
For more in-depth tutorials on Java, Spring, and modern software development practices, follow me for more content:
🔗 Blog 🔗 LinkedIn 🔗 Medium 🔗 Github
Stay tuned for more content on the latest in AI and software engineering!
Learn how to build an AI-powered stock portfolio advisor using Java, Spring Boot, LangChain4j, and OpenAI/Ollama. This guide walks you through integrating AI into your application to provide real-time investment advice based on the latest stock data.
Learn how to build a powerful stock broker agent using Next.js and AI SDK. This guide covers setup, LLM interactions, tools, building autonomous agents, and implementing human-in-the-loop processes.
Find the most popular YouTube creators in tech categories like AI, Java, JavaScript, Python, .NET, and developer conferences. Perfect for learning, inspiration, and staying updated with the best tech content.
Get instant AI-powered summaries of YouTube videos and websites. Save time while enhancing your learning experience.
