In this post we will learn how to implement JWT authentication with Spring 6 Security following best practices recommended in Spring docs without adding complex custom filters. We will use MongoDB as the database, but you can use any other database of your choice. We will add user authentication and authorization to a Social Media application.
Related: Learn about REST Client for API communication and Spring Boot Integration Testing for testing authenticated endpoints.
JWT or JSON Web Token, also known as JOT, is a popular method for implementing security in modern applications. Let's see how this works in a typical application with multiple microservices using REST, GraphQL,GRPC etc.
When a user tries to access a resource and is not authenticated, user will be directed to an authorization server to supply credentials like username, password, pass keys, or biometric information. The authorization server, such as Okta, Spring Authorization Server, or Keycloak, validates the credentials and issues a JWT token, signing it with its signature. The client then uses this token for subsequent requests to endpoints, which validate the token before responding.
A JWT token has three parts: header, payload, and signature.
iat (issued at), exp (expiration), etc.roleId.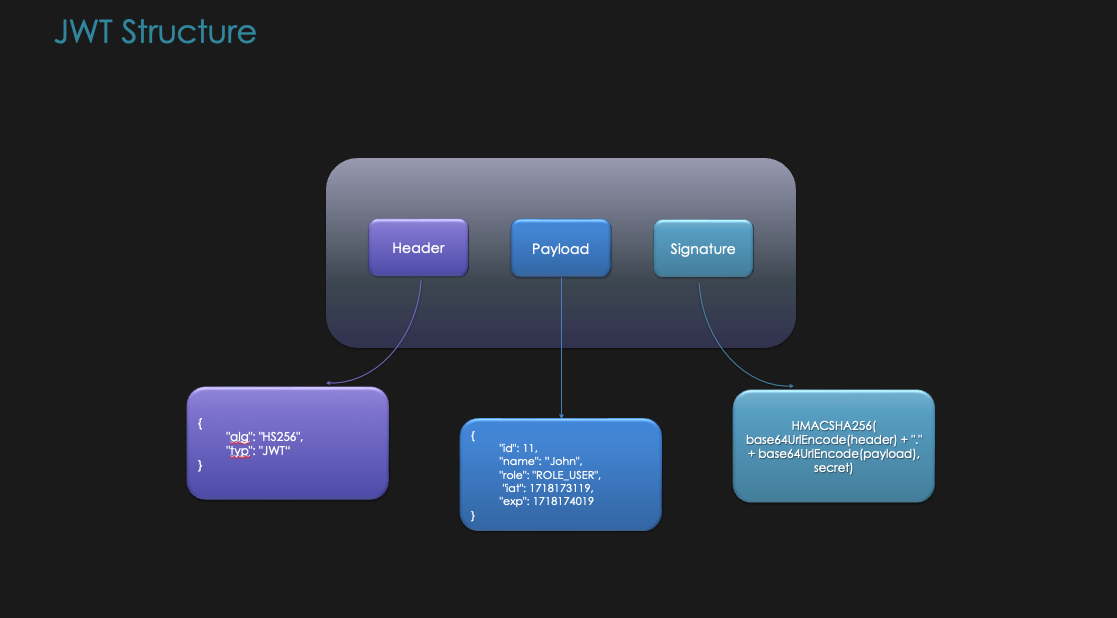
Spring MVC uses an embedded servlet container to service HTTP requests, typically using Tomcat. The DispatcherServlet acts as the front controller, routing requests to appropriate handlers based on mappings like @RequestMapping, @PostMapping, etc.
When Spring Security is added to the project, it intercepts all requests and applies security checks based on the configuration. It uses a chain of filters to perform tasks like authentication, authorization, and CSRF protection. When JWT is used for authentication, the BearerTokenAuthenticationFilter is added to the filter chain to validate the token.

Let's start by creating a new Spring Boot project using Spring Initializr. Add the following dependencies:
Let us first add a config class JWTConfig to build secret key and algorithm for JWT token. There are 2 types of algorithms supported by JWT, symmetric and asymmetric. We will use symmetric algorithm in this example.
@Configuration
public class JwtConfig {

    @Value("${security.jwt.secret-key}")
    private String secretKey;

    @Value("${security.jwt.expiration-time}")
    private long jwtExpiration;

    @Value("${security.jwt.algorithm}")
    private String algorithm;

    public SecretKey getSecretKey() {
        var key =new OctetSequenceKey.Builder(secretKey.getBytes())
                .algorithm(new JWSAlgorithm(algorithm))
                .build();
        return key.toSecretKey();
    }

    public JWSAlgorithm getAlgorithm() {
        return new JWSAlgorithm(algorithm);
    }
}
We will add secret key, expiration time and algorithm in application.properties file.
security.jwt.secret-key=secret-key
security.jwt.expiration-time=86400000
security.jwt.algorithm=HS256
Now let us add a SecurityConfig class to configure Spring Security with JWT authentication. We will disable CSRF, permit all requests to /user/** (to allow login and user registration without token) and authenticate all other requests.
Let us mark the session creation policy as STATELESS to ensure that Spring Security does not create a session for the user.
We are also configuring the JwtDecoder bean to use the secret key and algorithm we defined in JwtConfig class. Spring Security will use this decoder to validate the JWT token.
BCryptPasswordEncoder bean is added to encode the password before saving it to the database. This bean will be used later in the code.
@Configuration
@AllArgsConstructor
public class SecurityConfig {

    private final JwtConfig jwtConfig;
    private final UserRepository userRepository;

    @Bean
    public SecurityFilterChain securityFilterChain(HttpSecurity http) throws Exception {
        return http
                .csrf(AbstractHttpConfigurer::disable)
                .authorizeHttpRequests(authorizeRequests -> authorizeRequests
                        .requestMatchers("/user/**").permitAll()
                        .anyRequest().authenticated())
                .sessionManagement(sessionManagement -> sessionManagement
                        .sessionCreationPolicy(SessionCreationPolicy.STATELESS))
                .oauth2ResourceServer(configurer -> configurer.jwt(Customizer.withDefaults()))
                .build();
    }

    @Bean
    public JwtDecoder jwtDecoder() {
        return NimbusJwtDecoder.withSecretKey(jwtConfig.getSecretKey()).build();
    }

    @Bean
    public BCryptPasswordEncoder passwordEncoder() {
        return new BCryptPasswordEncoder();
    }

}
Now if you run the application after enabling TRACE level for spring security in application.properties file, you can see the spring security filter chain in the logs.
logging.level.org.springframework.security=TRACE
2025-01-11T23:57:33.543+11:00 DEBUG 3683 --- [social-media-api] [ restartedMain] o.s.s.web.DefaultSecurityFilterChain : Will secure any request with filters: DisableEncodeUrlFilter, WebAsyncManagerIntegrationFilter, SecurityContextHolderFilter, HeaderWriterFilter, LogoutFilter, BearerTokenAuthenticationFilter, RequestCacheAwareFilter, SecurityContextHolderAwareRequestFilter, AnonymousAuthenticationFilter, SessionManagementFilter, ExceptionTranslationFilter, AuthorizationFilter
Out of these filters, the BearerTokenAuthenticationFilter is the one that validates the JWT token.

Authentication in Spring Security is initiated by an AuthenticationManager. The AuthenticationManager is an interface, and its primary implementation is ProviderManager. You can configure multiple authentication providers with ProviderManager.
For example, if you want to validate against a database, you can configure a DaoAuthenticationProvider. If you want to validate a JWT token, you can configure a JwtAuthenticationProvider. You can configure any number of authentication providers as needed.
Depending on the configured providers, the AuthenticationManager will invoke the corresponding AuthenticationProvider. Each provider contains the logic for the specific type of authentication it handles.
In our case, while issuing the token, we will use a DaoAuthenticationProvider that fetches user details from MongoDB and compares the provided username and password. Once authenticated, the JWT token is issued.
For subsequent calls from the client, the JWT token is passed, and the JwtAuthenticationProvider is invoked by the bearer token filter. Upon successful authentication, the provider creates a SecurityContext.
The SecurityContextHolder class holds the SecurityContext as a thread-local variable. The SecurityContext contains an Authentication object, which has three fields:
Once the SecurityContext is set in the SecurityContextHolder, Spring Security assumes the user is authenticated. If any of the authentication providers set the SecurityContext, the user is considered authenticated.
This setup allows you to configure multiple authentication providers, such as database-based authentication or OAuth2 authentication against GitHub or Google.
Let us add a User model class with fields id, username, password, email, roles and active. We will also add a UserRepository interface that extends MongoRepository to perform CRUD operations on the User collection in MongoDB.
@Data
@Document("user")
public class User implements UserDetails {
    @Id
    private String id;
    private String name;
    private String email;
    private String password;
    private String profilePhoto;
    private List<String> roles;

    @Override
    public Collection<? extends GrantedAuthority> getAuthorities() {
        return roles.stream().map(SimpleGrantedAuthority::new).toList();
    }

    @Override
    public String getUsername() {
        return email;
    }

    @Override
    public boolean isAccountNonExpired() {
        return true;
    }

    @Override
    public boolean isAccountNonLocked() {
        return true;
    }

    @Override
    public boolean isCredentialsNonExpired() {
        return true;
    }

    @Override
    public boolean isEnabled() {
        return true;
    }
}

@Repository
public interface UserRepository extends MongoRepository<User, String> {
      Optional<User> findByEmail(String email);
}
@Document annotation is used to specify the collection name in MongoDB. The User class implements UserDetails interface, which is required by Spring Security to get user details. We have overridden the methods to return the user's roles, username, and account status.
Let us add a Authentication Provider and AuthenticationManager to authenticate the user using the email and password. We will use a DaoAuthenticationProvider to fetch the user details from the database and compare the password. Let us add these beans to the SecurityConfig class.
    // Existing code in SecurityConfig class

    @Bean
    AuthenticationProvider authenticationProvider() {
        DaoAuthenticationProvider authProvider = new DaoAuthenticationProvider();

        authProvider.setUserDetailsService(userDetailsService());
        authProvider.setPasswordEncoder(passwordEncoder());

        return authProvider;
    }

    @Bean
    public AuthenticationManager authManager(AuthenticationProvider authenticationProvider) {
        return new ProviderManager(authenticationProvider);
    }

    @Bean
    UserDetailsService userDetailsService() {
        return username -> userRepository.findByEmail(username)
                .orElseThrow(() -> new UsernameNotFoundException("User not found"));
    }
Let us add a LoginDto record to represent the login input and a LoginResponse class to represent the response after successful login.
public record LoginDto(String email, String password) {
}

public record LoginResponse(String token, String name, String email, String profilePhoto) {
}
Let us add a TokenService class to generate JWT token using the JwtConfig class.
@Service
@AllArgsConstructor
public class TokenService {

    private final JwtConfig jwtConfig;

    public String generateToken(Authentication authentication) {
        // header + payload/claims + signature
        var header = new JWSHeader.Builder(jwtConfig.getAlgorithm())
                .type(JOSEObjectType.JWT)
                .build();
        Instant now = Instant.now();
        var roles = authentication.getAuthorities().stream()
                .map(GrantedAuthority::getAuthority)
                .toList();
        var builder = new JWTClaimsSet.Builder()
                .issuer("Codewiz")
                .issueTime(Date.from(now))
                .expirationTime(Date.from(now.plus(1, java.time.temporal.ChronoUnit.HOURS)));
        builder.claim("roles", roles);
        var user = (User) authentication.getPrincipal();
        builder.claim("name", user.getName());
        builder.claim("email", user.getEmail());
        builder.claim("id", user.getId());
        var claims = builder.build();

        var key = jwtConfig.getSecretKey();

        var jwt = new SignedJWT(header, claims);

        try {
            var signer = new MACSigner(key);
            jwt.sign(signer);
        } catch (JOSEException e) {
            throw new RuntimeException("Error generating JWT",e);
        }
        return jwt.serialize();
    }
}
Here first we create the header with the algorithm and type. Then we create the claims with issuer, issue time, expiration time, roles, name, email and id. We then create a SignedJWT object with the header and claims. We then sign the JWT token using the secret key and return the serialized token.
Let us add a UserService class to register a new user and fetch user details by email.
@Service
@AllArgsConstructor
public class UserService {

    private final UserRepository userRepository;

    private final PasswordEncoder passwordEncoder;

    private final AuthenticationManager authenticationManager;

    private final TokenService tokenService;

    public User register(UserDto userDto) throws IOException {
        User user = new User();
        user.setName(userDto.name());
        user.setEmail(userDto.email());
        user.setPassword(passwordEncoder.encode(userDto.password()));
        var uuid =  UUID.randomUUID().toString();
        user.setId(uuid);
        user.setRoles(List.of("ROLE_USER"));
        return userRepository.save(user);
    }

    public LoginResponse authenticate(LoginDto input) {
        var authentication = authenticationManager.authenticate(
                new UsernamePasswordAuthenticationToken(input.email(), input.password()));
        var user = (User) authentication.getPrincipal();
        String token= tokenService.generateToken(authentication);
        String profilePhotoUrl = user.getProfilePhoto();
        return new LoginResponse(token, user.getName(), user.getEmail(), profilePhotoUrl);
    }
}
While registering user, we encode the password using BCryptPasswordEncoder and save the user details to the database.
While authenticating the user, we use the AuthenticationManager to authenticate the user using the email and password. If the user is authenticated, we generate a JWT token using the TokenService class and return the token along with the user details.
Now let us add a UserController class to handle user registration and login requests.
@RestController
@RequestMapping("/user")
@AllArgsConstructor
public class UserController {

    private final UserService userService;

    @PostMapping("/signup")
    public ResponseEntity<User> register(
            @RequestParam String name,
            @RequestParam String email,
            @RequestParam String password,
            @RequestParam(required = false) MultipartFile profilePhoto) throws IOException {
        UserDto registerUserDto = new UserDto(name, email, password, profilePhoto);
        User registeredUser = userService.register(registerUserDto);
        return ResponseEntity.ok(registeredUser);
    }


    @PostMapping("/signin")
    public ResponseEntity<LoginResponse> authenticate(@RequestBody LoginDto loginUserDto) {
        var loginResponse = userService.authenticate(loginUserDto);
        return ResponseEntity.ok(loginResponse);
    }
}
Now let us test the endpoints using httpie. You can also use tool like Postman or curl.
There is another endpoint which will return all the posts added by users. Now only authenticated users can access this endpoint.
First let us try to access it without token.
http GET ":8080/posts?page=0&size=20"
Response will be 401 Unauthorized.
HTTP/1.1 401
Cache-Control: no-cache, no-store, max-age=0, must-revalidate
Now let us register a new user
http --form POST :8080/user/signup name="Tom Thomas" email="tom.thomas3@codewiz.info" password="password"
HTTP/1.1 200

{
    "accountNonExpired": true,
    "accountNonLocked": true,
    "authorities": [
        {
            "authority": "ROLE_USER"
        }
    ],
    "credentialsNonExpired": true,
    "email": "tom.thomas3@codewiz.info",
    "enabled": true,
    "id": "3f0777b1-5af3-4727-bee1-9f3fbd7b7870",
    "name": "Tom Thomas",
    "profilePhoto": null,
    "roles": [
        "ROLE_USER"
    ],
    "username": "tom.thomas3@codewiz.info"
}
Now let us login and get the token
http POST :8080/user/signin email="tom.thomas3@codewiz.info" password="password"
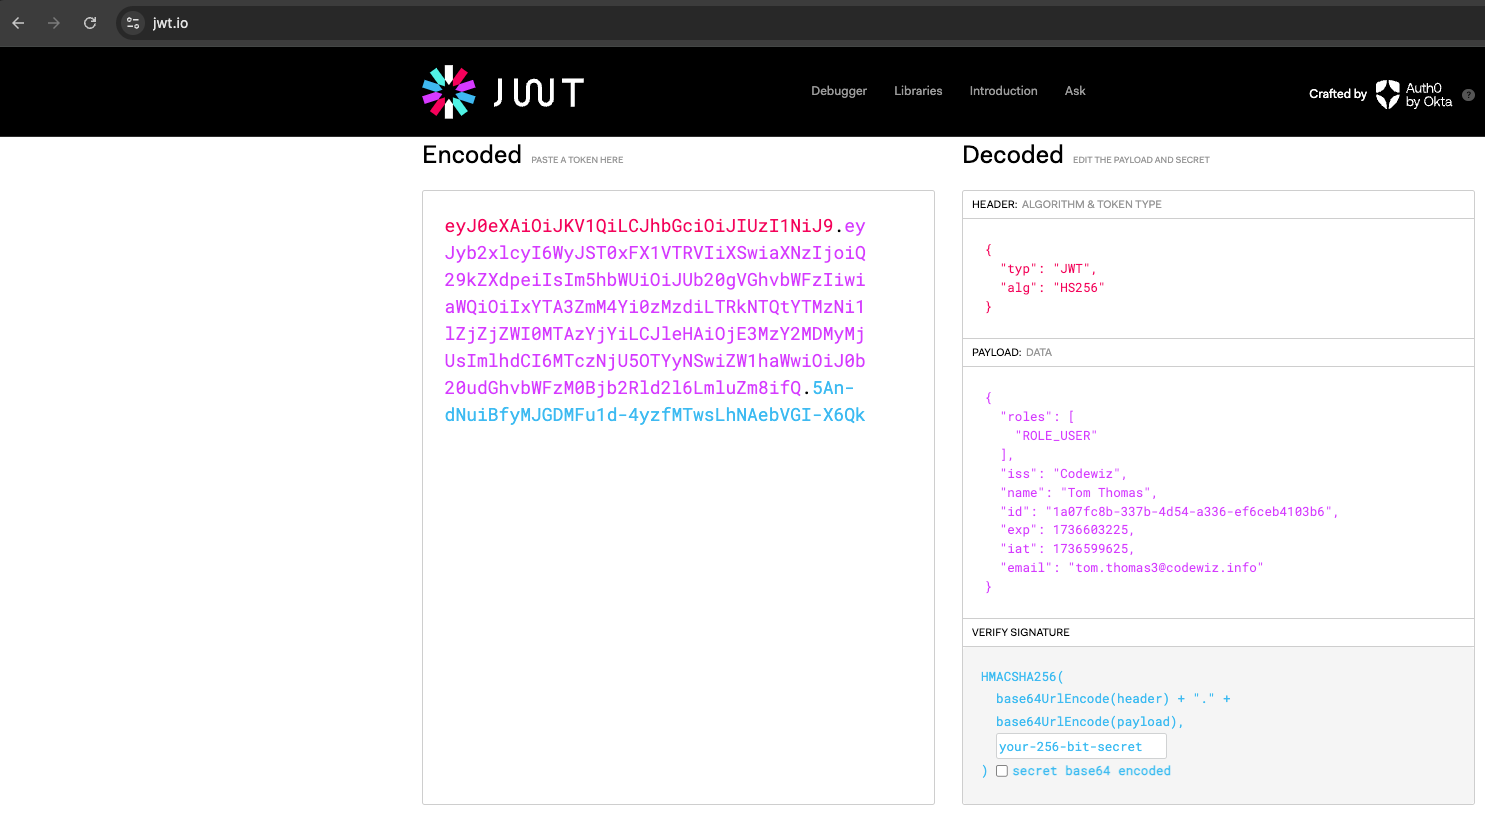
HTTP/1.1 200

{
    "email": "tom.thomas3@codewiz.info",
    "name": "Tom Thomas",
    "profilePhoto": null,
    "token": "eyJ0eXAiOiJKV1QiLCJhbGciOiJIUzI1NiJ9.eyJyb2xlcyI6WyJST0xFX1VTRVIiXSwiaXNzIjoiQ29kZXdpeiIsIm5hbWUiOiJUb20gVGhvbWFzIiwiaWQiOiIxYTA3ZmM4Yi0zMzdiLTRkNTQtYTMzNi1lZjZjZWI0MTAzYjYiLCJleHAiOjE3MzY2MDMyMjUsImlhdCI6MTczNjU5OTYyNSwiZW1haWwiOiJ0b20udGhvbWFzM0Bjb2Rld2l6LmluZm8ifQ.5An-dNuiBfyMJGDMFu1d-4yzfMTwsLhNAebVGI-X6Qk"
}
If you want to decode the token, you can use a tool like jwt.io
Now let us access the /posts endpoint with the token
http GET ":8080/posts?page=0&size=20" Authorization:"Bearer eyJ0eXAiOiJKV1QiLCJhbGciOiJIUzI1NiJ9.eyJyb2xlcyI6WyJST0xFX1VTRVIiXSwiaXNzIjoiQ29kZXdpeiIsIm5hbWUiOiJUb20gVGhvbWFzIiwiaWQiOiIxYTA3ZmM4Yi0zMzdiLTRkNTQtYTMzNi1lZjZjZWI0MTAzYjYiLCJleHAiOjE3MzY2MDMyMjUsImlhdCI6MTczNjU5OTYyNSwiZW1haWwiOiJ0b20udGhvbWFzM0Bjb2Rld2l6LmluZm8ifQ.5An-dNuiBfyMJGDMFu1d-4yzfMTwsLhNAebVGI-X6Qk"
Response will be 200 OK with the posts.
HTTP/1.1 200

{
    "content": [
        {
            "createdAt": "2024-10-06T23:41:12.64",
            "creator": {
                "id": "5d9b93ac-144e-4ce1-addb-daea5c21e762",
                "name": "Jack Harris",
                "profilePhoto": "https://social-media-app-codewiz.s3.ap-southeast-2.amazonaws.com/5d9b93ac-144e-4ce1-addb-daea5c21e762-profile?X-Amz-Algorithm=AWS4-HMAC-SHA256&X-Amz-Date=20250111T124951Z&X-Amz-SignedHeaders=host&X-Amz-Credential=AKIAWAA66F3ULIK5GCOP%2F20250111%2Fap-southeast-2%2Fs3%2Faws4_request&X-Amz-Expires=172800&X-Amz-Signature=caa0accd914deca55ec4a4259054f2b452e9864992e4f34f647596fa6edbfb50"
            },
            "id": "67028568b570614662dbc4b3",
            "likes": 2,
            "mediaType": "IMAGE",
            "mediaUrl": "bc211d82-d151-4055-8898-4e2f55e233ce - music_event2_m4_eag_cln_v3_upload_img_87573765_08_29_2024_01_43_34_693039_2502129648486660496.jpeg",
            "presignedUrl": "https://social-media-app-codewiz.s3.ap-southeast-2.amazonaws.com/bc211d82-d151-4055-8898-4e2f55e233ce%20-%20music_event2_m4_eag_cln_v3_upload_img_87573765_08_29_2024_01_43_34_693039_2502129648486660496.jpeg?X-Amz-Algorithm=AWS4-HMAC-SHA256&X-Amz-Date=20250111T124951Z&X-Amz-SignedHeaders=host&X-Amz-Credential=AKIAWAA66F3ULIK5GCOP%2F20250111%2Fap-southeast-2%2Fs3%2Faws4_request&X-Amz-Expires=172800&X-Amz-Signature=689cb117a85153801ff18ab38f6efb80a51785cb46e386b73ee4b41461b234fb",
            "tags": [
                "music",
                "party"
            ],
            "text": "Enjoy the music show tonight in Paris",
            "title": "Today in Paris"
        },
        {
            "createdAt": "2024-10-05T21:19:27.15",
            "creator": {
                "id": "5d9b93ac-144e-4ce1-addb-daea5c21e762",
                "name": "Jack Harris",
                "profilePhoto": "https://social-media-app-codewiz.s3.ap-southeast-2.amazonaws.com/5d9b93ac-144e-4ce1-addb-daea5c21e762-profile?X-Amz-Algorithm=AWS4-HMAC-SHA256&X-Amz-Date=20250111T124951Z&X-Amz-SignedHeaders=host&X-Amz-Credential=AKIAWAA66F3ULIK5GCOP%2F20250111%2Fap-southeast-2%2Fs3%2Faws4_request&X-Amz-Expires=172800&X-Amz-Signature=caa0accd914deca55ec4a4259054f2b452e9864992e4f34f647596fa6edbfb50"
            },
            "id": "670120bfb570614662dbc4af",
            "likes": 1,
            "mediaType": "IMAGE",
            "mediaUrl": "a3a2a391-21a9-48ba-80c9-8e1efd91537c - wild_life_m4_cln_nha_v3_upload_img_70038916_08_29_2024_01_41_42_127932_2861633313165320011.jpeg",
            "presignedUrl": "https://social-media-app-codewiz.s3.ap-southeast-2.amazonaws.com/a3a2a391-21a9-48ba-80c9-8e1efd91537c%20-%20wild_life_m4_cln_nha_v3_upload_img_70038916_08_29_2024_01_41_42_127932_2861633313165320011.jpeg?X-Amz-Algorithm=AWS4-HMAC-SHA256&X-Amz-Date=20250111T124951Z&X-Amz-SignedHeaders=host&X-Amz-Credential=AKIAWAA66F3ULIK5GCOP%2F20250111%2Fap-southeast-2%2Fs3%2Faws4_request&X-Amz-Expires=172800&X-Amz-Signature=2cefe70bb60bf3b3be95cef90d9f53d656996885eb0337070991b1b9facea63a",
            "tags": [
                "nature",
                "wildlife"
            ],
            "text": "Stories of survival, adaptability, and beauty, told through the lens",
            "title": "Roar of the Wild"
        }
    ],
}
In this post, we learned how to implement JWT authentication with Spring 6 Security following best practices recommended in Spring docs without custom filters.
To stay updated with the latest updates in Java and Spring follow us on linked in and medium.
You can find the code used in this blog here
This guide explores the features and usage of the RestClient introduced in Spring 6, providing a modern and fluent API for making HTTP requests. It demonstrates how to create and customize RestClient instances, make API calls, and handle responses effectively.
Learn how to create efficient integration tests for your Spring Boot APIs using Testcontainers and the Rest Assured library. This blog will guide you through building fluent integration tests for an API that interacts with MongoDB and AWS S3.
Find the most popular YouTube creators in tech categories like AI, Java, JavaScript, Python, .NET, and developer conferences. Perfect for learning, inspiration, and staying updated with the best tech content.
Get instant AI-powered summaries of YouTube videos and websites. Save time while enhancing your learning experience.
