Few months back I started working on a gRPC based project in finance domain and had to spend time understanding the basics of gRPC and implement it in Java. This blog is based on my learning and experience from that project. In this, we will learn about gRPC and how to build gRPC microservices in Java and Spring Boot. gRPC is a high-performance, open-source RPC (Remote Procedure Call) framework initially developed by Google. It uses HTTP/2 for transport, Protocol Buffers as the interface description language, and provides features like bidirectional streaming, header compression, and more.

Let us quickly look at the evolution of RPC technologies:
Initially, we had technologies like CORBA (Common Object Request Broker Architecture) and RMI (Remote Method Invocation) for building distributed systems. These technologies were complex and had limitations like language-specific bindings and lack of interoperability.
Then SOAP (Simple Object Access Protocol) was introduced as a standard for exchanging structured information in XML format. SOAP messages were typically sent over HTTP, but they were verbose and complex.
Introduction of REST completely changed the way APIs were built. In REST we identify resources using URIs and use standard HTTP methods like GET, POST, PUT, DELETE to interact with the server. REST APIs are easy to understand and implement and easy to integrate with web applications. REST APIs usually use JSON for data serialization and continue to be most widely used for building APIs.
However, like any other technology REST APIs also have some limitations which make them not suitable for some use cases. gRPC and GraphQL emerged as alternatives to address such scenarios.
Before diving into gRPC, let's understand how traditional REST APIs work:
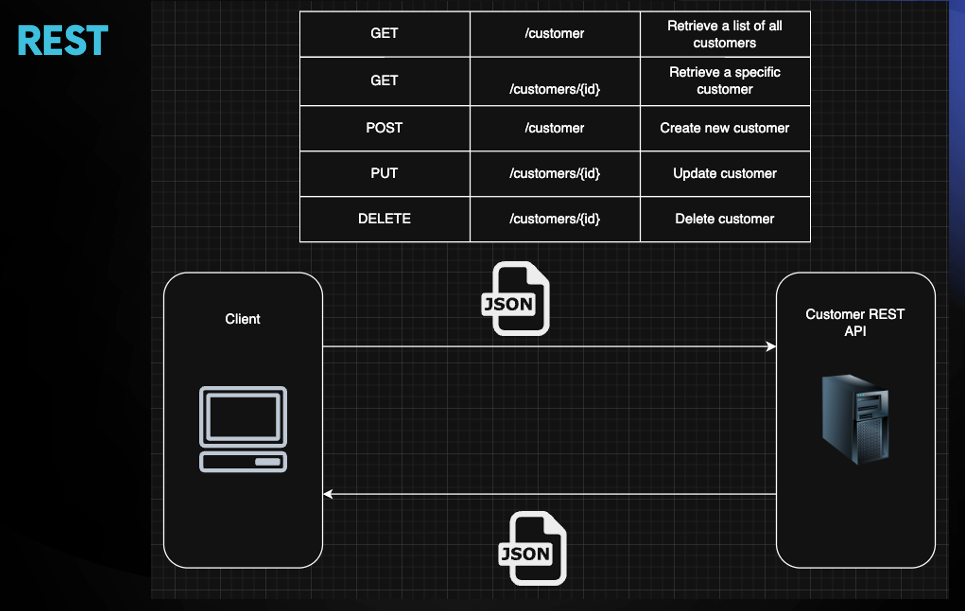
In REST a resource is identified by a URI (Uniform Resource Identifier), and clients interact with the server using standard HTTP methods like GET, POST, PUT, DELETE. The server sends responses usually in JSON format. REST mostly use HTTP/1.1 for transport.
Although REST is the most simple and easy way to build APIs, it has some limitations.
JSON format is a human-readable format but is not machine friendly. During serialization and deserialization, JSON parsing can be slow and inefficient. Also network bandwidth is wasted due to the verbosity of JSON.
Moreover, for REST there is no standard way to define the API contract. Developers use tools like Swagger to define the API contract, but it is not enforced at runtime.
For small to medium-sized applications, REST APIs are sufficient. But for large-scale applications with hundreds of microservices and performance-critical applications, these limitations can be a bottleneck.

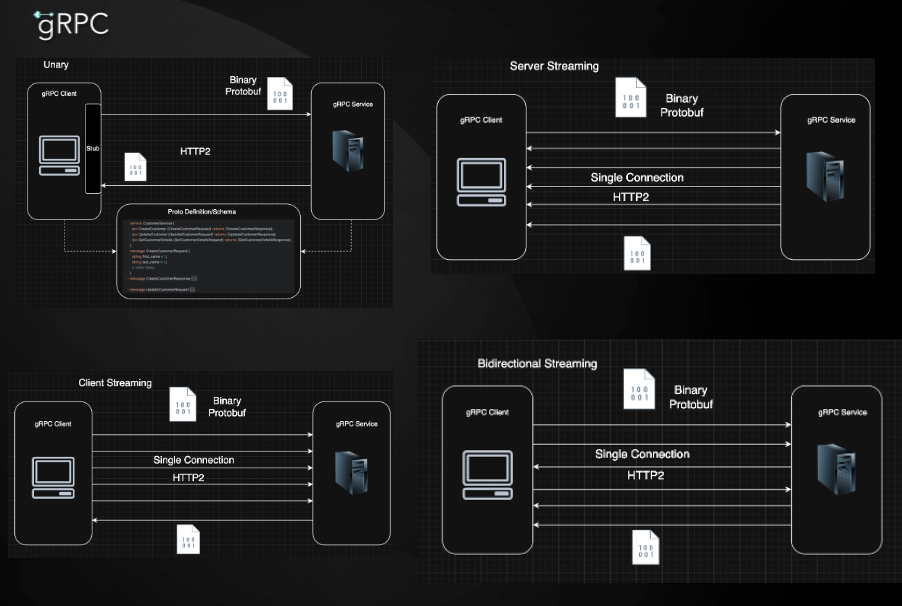
First you define the service methods and message types in the protobuf file. This creates the schema for your API.
Then you generate basic client and server code in the language of your choice using the Protocol Buffers compiler.
After that you implement the business logic in the server and client without worrying about serialization and deserialization and network communication.
You can call RPC method from the client as if it is a local method call. gRPC takes care of the rest. It serializes the request and response messages using Protocol Buffers to compact binary format and sends them over HTTP/2.
gRPC offers several advantages over traditional REST APIs:
One example of performance is mentioned in the Atlassian Blog - Using Protobuf to make Jira Cloud faster where they have given the below statistics:
In the below code, I am writing a list of customers to file in both JSON and Protocol Buffers format. You can see the difference in file size.
Size of protobuf file is only one-third of the JSON file.
public class GrpcPlayground {

    public static void main(String[] args) throws IOException {

        var customers =  List.of(
                new Customer(1, "John", "Doe", "john.doe@example.com", "123-456-7890", "123 Main St"),
                new Customer(2, "Jane", "Smith", null, null, "456 Elm St"),
                new Customer(3, "Alice", "Johnson", "alice.johnson@example.com", null, "789 Oak St"),
                new Customer(4, "Bob", "Brown", null, "987-654-3210", "321 Pine St"),
                new Customer(5, "Charlie", "Davis", "charlie.davis@example.com", "555-555-5555", "654 Maple St")
        );

        ObjectMapper objectMapper = new ObjectMapper();
        objectMapper.writeValue(new File("customers.json"), customers);


        try (FileOutputStream outputStream = new FileOutputStream("customers.bin")) {
            for (var customer : customers) {
                com.codewiz.patient.Customer protoCustomer = com.codewiz.patient.Customer.newBuilder()
                        .setCustomerId(customer.customerId())
                        .setFirstName(customer.firstName())
                        .setLastName(customer.lastName())
                        .setEmail(customer.email() != null ? customer.email() : "")
                        .setPhone(customer.phone() != null ? customer.phone() : "")
                        .setAddress(customer.address())
                        .build();
                protoCustomer.writeTo(outputStream);
            }
        }

    }
}
~/Projects/healthcare-app
ls -ltr customer*
-rw-r--r--  1 622 Jan 24 18:12 customers.json
-rw-r--r--  1 260 Jan 24 18:12 customers.bin


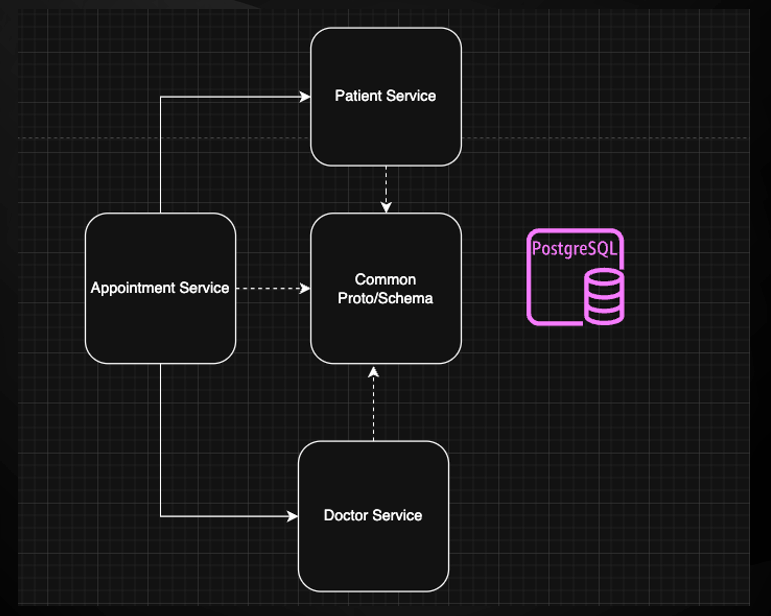
We are going to build a simple healthcare application with the below 3 microservices:
We will create this as a multi-module Maven project with each microservice as a separate module. We will use the Official Spring Boot gRPC Starter to build the gRPC services in Java and Spring Boot
Let us go to Spring Initializr and create a new Maven project with the below dependencies:
Let us name this as healthcare-application.
We will use docker compose to run a postgres database and also pgadmin to access a UI to run queries. Create a docker-compose.yml file with the below content:
services:
  postgres:
    image: 'postgres:latest'
    environment:
      - 'POSTGRES_DB=healthcare-app-db'
      - 'POSTGRES_PASSWORD=secret'
      - 'POSTGRES_USER=healthcare-user'
    ports:
      - '5432:5432'
    restart: unless-stopped
  pgadmin:
    image: dpage/pgadmin4
    environment:
      PGADMIN_DEFAULT_EMAIL: admin@example.com
      PGADMIN_DEFAULT_PASSWORD: admin
    ports:
      - "8081:80"
    depends_on:
      - postgres
    restart: unless-stopped
For this blog we will use the same database for all services. In a real-world scenario, you would have separate databases for each service.
Now let us create the below 4 modules under the healthcare-application project:
Submodule common will be used for keeping proto files and common classes shared across services.
You can create submodules in intellij by right-clicking on the parent project -> New -> Module -> Maven -> Next -> Enter Module Name -> Finish
Let us add a new file patient.proto under the common module with the below content:
syntax = "proto3"; // version of the protocol buffer language

option java_multiple_files = true; // generate multiple java files. Otherwise, all classes will be generated in a single file

package com.codewiz.patient;

service PatientService {
  rpc RegisterPatient (PatientRegistrationRequest) returns (PatientRegistrationResponse);
  rpc GetPatientDetails (PatientDetailsRequest) returns (PatientDetails);
}

message PatientRegistrationRequest {
  string first_name = 1;
  string last_name = 2;
  string email = 3;
  string phone = 4;
  string address = 5;
}

message PatientRegistrationResponse {
  int64 patient_id = 1;
  string message = 2;
}

message PatientDetailsRequest {
  int64 patient_id = 1;
}

message PatientDetails {
  int64 patient_id = 1;
  string first_name = 2;
  string last_name = 3;
  string email = 4;
  string phone = 5;
  string address = 6;
}
PatientService has 2 Unary RPC methods under service section:
RegisterPatient: To register a new patientGetPatientDetails: To get patient details by patient idmessage section defines the request and response message structure for each RPC method.
Now let us run the below command to generate Java classes from the proto file:
mvn clean compile
This will generate Java classes in target directory under the common module.
If you are using IntelliJ IDEA for build, you need to mark the generated directory as a source root.
Let us add a java record Patient under the patient-service module which is mapped to the patient table in the database.
@Table("patient")
public record Patient(@Id Long id, String firstName, String lastName, String email, String phone,String address) {
}
Also let us create a repository interface PatientRepository which extends CrudRepository:
@Repository
public interface PatientRepository extends CrudRepository<Patient, Long> {
}
We need to add dependency for common-proto module in the patient-service module.
<dependency>
    <groupId>com.codewiz</groupId>
    <artifactId>common-proto</artifactId>
    <version>1.0.0</version>
</dependency>
For implementing the Patient gRPC service, we will add a class PatientService which will extend the generated PatientServiceGrpc.PatientServiceImplBase class and implement the service methods
We will use @Service annotation to mark this class as a Spring service.
@Service
public class PatientService extends PatientServiceGrpc.PatientServiceImplBase {

    private final PatientRepository patientRepository;

    public PatientService(PatientRepository patientRepository) {
        this.patientRepository = patientRepository;
    }

    @Override
    public void registerPatient(RegisterPatientRequest request, StreamObserver<RegisterPatientResponse> responseObserver) {
        Patient patient = new Patient(
                null,
                request.getFirstName(),
                request.getLastName(),
                request.getEmail(),
                request.getPhone()
        );
        patient = patientRepository.save(patient);
        responseObserver.onNext(RegisterPatientResponse.newBuilder().setPatientId(patient.id()).build());
        responseObserver.onCompleted();
    }

    @Override
    public void getPatientDetails(GetPatientDetailsRequest request, StreamObserver<GetPatientDetailsResponse> responseObserver) {
        var patient = patientRepository.findById(request.getPatientId());
        if (patient.isPresent()) {
            var p = patient.get();
            responseObserver.onNext(GetPatientDetailsResponse.newBuilder()
                    .setPatientId(p.id())
                    .setFirstName(p.firstName())
                    .setLastName(p.lastName())
                    .setEmail(p.email())
                    .setPhone(p.phone())
                    .build());
        } else {
            responseObserver.onError(io.grpc.Status.NOT_FOUND.withDescription("Patient not found").asRuntimeException());
        }
        responseObserver.onCompleted();
    }
}
If you have noticed, in the above code, we are not returning anything from the service methods. Instead, we are using the StreamObserver to send the response back to the client. This is because gRPC APIs are designed to support different types of streaming like unary, server streaming, client streaming, and bidirectional streaming. Also API methods in gRPC are asynchronous and non-blocking.
ResponseObserver.next() is used to send a response back to the client. We can call this method multiple times to send multiple responses.
ResponseObserver.onCompleted() is used to indicate that the response is complete. ResponseObserver.onError() is used to send an error back to the client.
In application.properties file, we need to add the below properties to configure the database:
spring.datasource.url=jdbc:postgresql://localhost:5432/healthcare-app-db
spring.datasource.username=healthcare-user
spring.datasource.password=secret
spring.datasource.driver-class-name=org.postgresql.Driver
Now let us add the below class to make PatientService a Spring Boot App and start the gRPC server:
@SpringBootApplication
public class PatientServiceApplication {

    public static void main(String[] args) {
        SpringApplication.run(PatientServiceApplication.class, args);
    }
}
By default, gRPC server runs on port 9090. You can change this by adding the below property in application.properties:
spring.grpc.server.port=9091
There are multiple ways to test the gRPC service including Postman, grpcurl and grpcui
For this blog, we will use grpcurl to test the gRPC service. You can install grpcurl from the official repository.
To list all services:
grpcurl -plaintext localhost:9090 list
To create a new patient:
grpcurl -plaintext -d '{
  "first_name": "Jin",
  "last_name": "Thompson",
  "email": "jin.thompson@codewiz.info",
  "phone": "123-456-7890",
  "address": "123 Main St"
}' localhost:9090 com.codewiz.patient.PatientService/RegisterPatient
To get patient details:
grpcurl -plaintext -d '{"patient_id": 1}' localhost:9090 com.codewiz.patient.PatientService/GetPatientDetails
We can follow similar steps to add the Doctor Service. You can refer to the complete code here.
In Appointment Service, we will have couple of RPCs:
GetAppointmentAvailability: To get all appointment slots available for a doctor. This will be a server streaming RPC where the server sends a stream of responses to the client.BookAppointment : To book an appointment with a doctor. This will be a unary RPC.Let us add a appointment.proto file under the appointment-service module with the below content:
service AppointmentService {
  rpc BookAppointment (BookAppointmentRequest) returns (BookAppointmentResponse);
  rpc GetAppointmentAvailability (AppointmentAvailabilityRequest) returns (stream AppointmentAvailabilityResponse);
}

message BookAppointmentRequest {
  int64 doctor_id = 1;
  int64 patient_id = 2;
  string appointment_date = 3;
  string appointment_time = 4;
  string reason = 5;
}

message BookAppointmentResponse {
  int64 appointment_id = 1;
  string message = 2;
}

message AppointmentAvailabilityRequest {
  int64 doctor_id = 1;
}

message AppointmentSlot {
  string appointment_date = 1;
  string appointment_time = 2;
  bool is_available = 3;
}

message AppointmentAvailabilityResponse {
  string availability_as_of = 1;
  repeated AppointmentSlot responses = 2;
}
GetAppointmentAvailability has return type as stream which indicates that the server will send a stream of responses to the client.
Now let us generate Java classes from the proto file:
mvn clean compile
Now let us add a Java record Appointment under the appointment-service module which is mapped to the appointment table in the database.
public record Appointment(
        @Id Long id,
        Long patientId,
        String patientName,
        Long doctorId,
        String doctorName,
        String location,
        LocalDate appointmentDate,
        LocalTime appointmentTime,
        String reason
) {
}
Also let us create a repository interface AppointmentRepository which extends CrudRepository:
public interface AppointmentRepository extends CrudRepository<Appointment, Long> {
    List<Appointment> findByDoctorId(long doctorId);
}
We need to add dependency for common-proto module in the appointment-service module.
<dependency>
    <groupId>com.codewiz</groupId>
    <artifactId>common-proto</artifactId>
    <version>1.0.0</version>
</dependency>
Now let us add a class AppointmentService which will extend the generated AppointmentServiceGrpc.AppointmentServiceImplBase class and implement the service methods
@Service
public class AppointmentService extends AppointmentServiceGrpc.AppointmentServiceImplBase {

    private final AppointmentRepository appointmentRepository;


    public AppointmentService(AppointmentRepository appointmentRepository) {
        this.appointmentRepository = appointmentRepository;

    }

    @Override
    public void bookAppointment(Appointment.BookAppointmentRequest request, StreamObserver<Appointment.BookAppointmentResponse> responseObserver) {
        var appointment = new Appointment(
                null,
                request.getPatientId(),
                null, // TODO
                request.getDoctorId(),
                null,// TODO
                // TODO,
                LocalDate.parse(request.getAppointmentDate()),
                LocalTime.parse(request.getAppointmentTime()),
                request.getReason()
        );
        appointment = appointmentRepository.save(appointment);
        responseObserver.onNext(Appointment.BookAppointmentResponse.newBuilder().setAppointmentId(appointment.id()).build());
        responseObserver.onCompleted();
    }

    public void getAppointmentAvailability(Appointment.GetAppointmentAvailabilityRequest request, StreamObserver<Appointment.GetAppointmentAvailabilityResponse> responseObserver) {
        List<LocalDateTime> hardcodedAppointments = Arrays.asList(
                LocalDateTime.of(2025, 1, 7, 9, 0),
                LocalDateTime.of(2025, 1, 8, 9, 30),
                LocalDateTime.of(2025, 1, 8, 10, 0),
                LocalDateTime.of(2025, 1, 8, 10, 30),
                LocalDateTime.of(2025, 1, 9, 11, 0),
                LocalDateTime.of(2025, 1, 11, 11, 30),
                LocalDateTime.of(2025, 1, 11, 13, 0),
                LocalDateTime.of(2025, 1, 12, 13, 30),
                LocalDateTime.of(2025, 1, 12, 14, 0),
                LocalDateTime.of(2025, 1, 13, 14, 30)
        );
        Random random = new Random();
        int i = 0;
        try {
            while (i < 10) {
                Collections.shuffle(hardcodedAppointments, random);
                var response = Appointment.GetAppointmentAvailabilityResponse.newBuilder()
                        .addAllResponses(
                                hardcodedAppointments.stream()
                                        .limit(2)
                                        .map(dateTime -> Appointment.AppointmentSlot.newBuilder()
                                                .setAppointmentDate(dateTime.toLocalDate().toString())
                                                .setAppointmentTime(dateTime.toLocalTime().toString())
                                                .build())
                                        .collect(Collectors.toList())
                        )
                        .setAvailabilityAsOf(LocalDateTime.now().toString())
                        .build();
                responseObserver.onNext(response);
                Thread.sleep(2000);
                i++;
            }
        } catch (InterruptedException e) {
            Thread.currentThread().interrupt();
        } finally {
            responseObserver.onCompleted();
        }
    }
}
bookAppointment is a simple unary RPC which stores appointment data in the database and returns the appointment id.
getAppointmentAvailability is a server streaming RPC which sends a stream of appointment slots to the client. We are sending 2 random appointment slots every 2 seconds for a total of 10 times. onNext() is used to send a response back to the client 10 times. onCompleted() is called after that to indicate that the response is complete.
In application.properties file, we need to add the below properties to configure the database and port:
spring.datasource.url=jdbc:postgresql://localhost:5432/healthcare-app-db
spring.datasource.username=healthcare-user
spring.datasource.password=secret
spring.datasource.driver-class-name=org.postgresql.Driver
spring.application.name=appointment-service
spring.grpc.server.port=9092
You can test the Appointment Service using grpcurl similar to the Patient Service.
Book an appointment:
grpcurl -plaintext -d '{
  "doctor_id": 10,
  "patient_id": 2,
  "appointment_date": "2023-12-01",
  "appointment_time": "10:00",
  "reason": "Routine check-up"
}' localhost:9092 com.codewiz.appointment.AppointmentService/BookAppointment
Get appointment availability:
grpcurl -plaintext -d '{
  "doctor_id": 10,
  "patient_id": 2,
  "appointment_date": "2023-12-01",
  "appointment_time": "10:00",
  "reason": "Routine check-up"
}' localhost:9092 com.codewiz.appointment.AppointmentService/BookAppointment
Now let us see how we can call gRPC services from other microservices. Say while booking an appointment, we need to see if doctor and patient exist. Also we need to store some details of the patient and doctor in the appointment table.
We can call the Patient and Doctor services from the Appointment service.
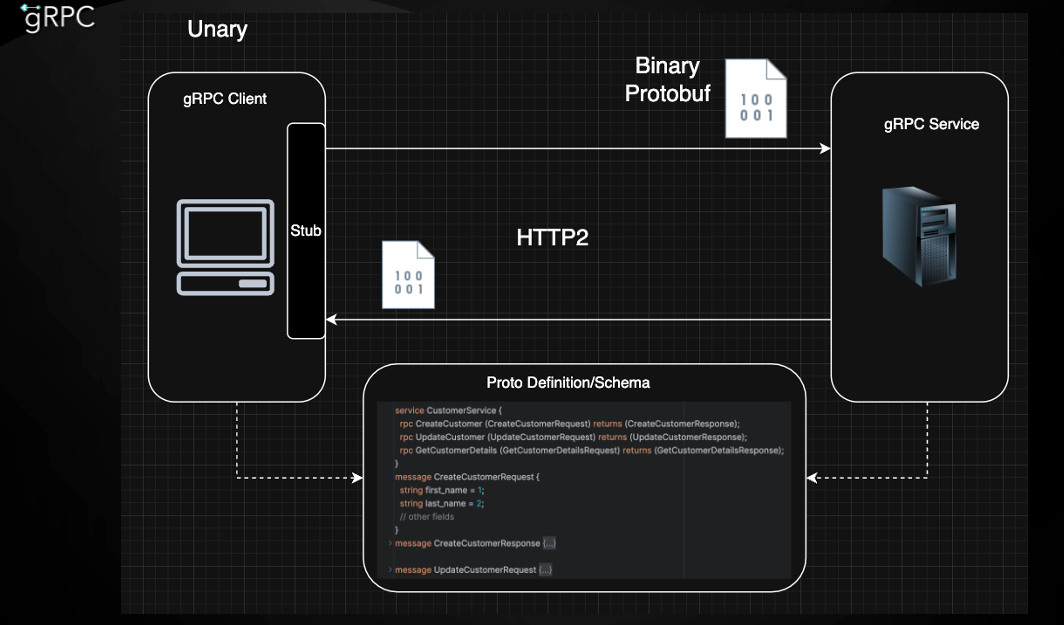
When we generate the code from proto files, we get a Stub class for each service. We can use this Stub class to make gRPC calls. There are 3 types of stubs:
CompletableFutureWe will use the blocking stub to make synchronous calls. We will add the stubs for calling Patient and Doctor services as beans in the Appointment service.
@Configuration
public class GrpcStub {

    @Bean
    DoctorServiceGrpc.DoctorServiceBlockingStub doctorServiceBlockingStub(GrpcChannelFactory channels) {
        return DoctorServiceGrpc.newBlockingStub(channels.createChannel("doctorService"));
    }

    @Bean
    PatientServiceGrpc.PatientServiceBlockingStub patientServiceBlockingStub(GrpcChannelFactory channels) {
        return PatientServiceGrpc.newBlockingStub(channels.createChannel("patientService"));
    }
}
We can specify the host and port of the gRPC services in application.properties:
spring.grpc.client.channels.doctorService.address=0.0.0.0:9091
spring.grpc.client.channels.patientService.address=0.0.0.0:9090
Now let us change AppointmentService to use these stubs to call Patient and Doctor services and validate the patient and doctor.
@Service
public class AppointmentService extends AppointmentServiceGrpc.AppointmentServiceImplBase {

    private final AppointmentRepository appointmentRepository;
    private final DoctorServiceGrpc.DoctorServiceBlockingStub doctorService;
    private final PatientServiceGrpc.PatientServiceBlockingStub patientService;

    public AppointmentService(AppointmentRepository appointmentRepository, DoctorServiceGrpc.DoctorServiceBlockingStub doctorService, PatientServiceGrpc.PatientServiceBlockingStub patientService) {
        this.appointmentRepository = appointmentRepository;
        this.doctorService = doctorService;
        this.patientService = patientService;
    }

    @Override
    public void bookAppointment(Appointment.BookAppointmentRequest request, StreamObserver<Appointment.BookAppointmentResponse> responseObserver) {
        try {
            var doctorResponse = doctorService.getDoctorDetails(GetDoctorDetailsRequest.newBuilder().setDoctorId(request.getDoctorId()).build());
            var patientResponse = patientService.getPatientDetails(GetPatientDetailsRequest.newBuilder().setPatientId(request.getPatientId()).build());
            var appointment = new Appointment(
                    null,
                    request.getPatientId(),
                    patientResponse.getFirstName() + " " + patientResponse.getLastName(),
                    request.getDoctorId(),
                    doctorResponse.getFirstName() + " " + doctorResponse.getLastName(),
                    doctorResponse.getLocation(),
                    LocalDate.parse(request.getAppointmentDate()),
                    LocalTime.parse(request.getAppointmentTime()),
                    request.getReason()
            );
            appointment = appointmentRepository.save(appointment);
            responseObserver.onNext(Appointment.BookAppointmentResponse.newBuilder().setAppointmentId(appointment.id()).build());
        }
        catch (StatusRuntimeException e) {
            responseObserver.onError(Status.NOT_FOUND.withDescription(e.getMessage()).asRuntimeException());
            return;
        }
        responseObserver.onCompleted();
    }

    // getAppointmentAvailability method remains the same
}
We can use the blocking stub to call the server streaming which will return an iterator. We can iterate over the iterator to get the stream of responses.
Iterator<AppointmentAvailabilityResponse> responseIterator =
    appointmentBlockingStub.getAppointmentAvailability(AppointmentAvailabilityRequest.newBuilder().setDoctorId(request.getDoctorId()).build());
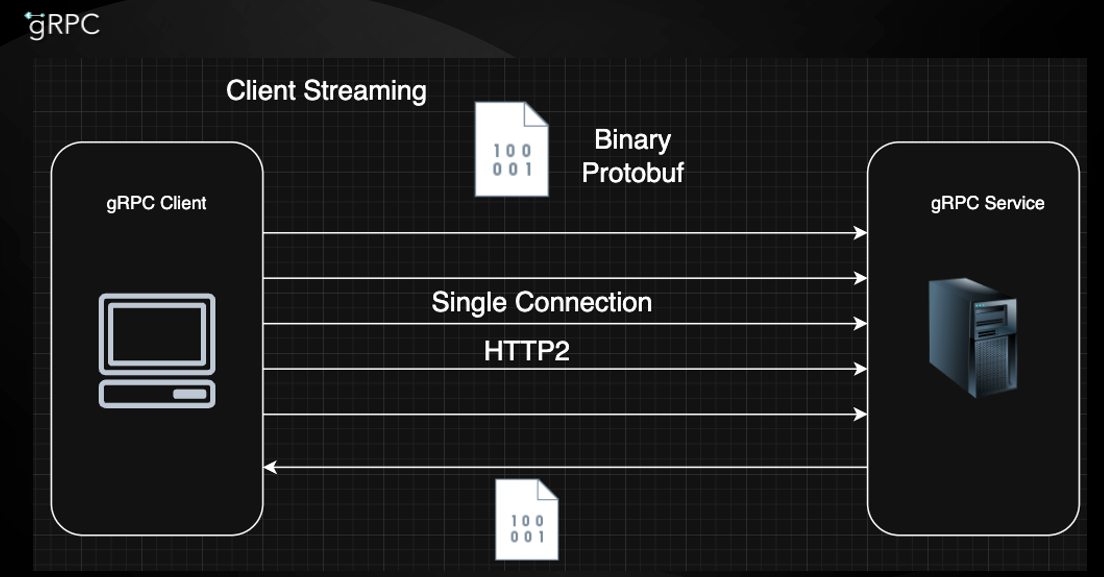
In client-side streaming, the client sends a stream of requests to the server and gets back a single response. This is useful when the client needs to send a large amount of data to the server.
Let us add a new RPC method StreamPatients to the Patient Service which accepts a stream of patient data and saves it to the database.
service PatientService {
  rpc RegisterPatient (PatientRegistrationRequest) returns (PatientRegistrationResponse);
  rpc GetPatientDetails (PatientDetailsRequest) returns (PatientDetails);
  rpc StreamPatients (stream PatientRegistrationRequest) returns (Empty);
}

message Empty {}
StreamPatients has a input type of stream which indicates that the client will send a stream of messages to the server.
Now let us generate Java classes from the proto file:
mvn clean compile
Now let us add a new method streamPatients to the PatientService class to handle the stream of patient data.
@Service
public class PatientService extends PatientServiceGrpc.PatientServiceImplBase {

    private final PatientRepository patientRepository;

    public PatientService(PatientRepository patientRepository) {
        this.patientRepository = patientRepository;
    }

    @Override
    public StreamObserver<PatientRegistrationRequest> streamPatients(StreamObserver<Empty> responseObserver) {
        return new StreamObserver<PatientRegistrationRequest>() {
            @Override
            public void onNext(PatientRegistrationRequest patientData) {
                var patient = new com.codewiz.model.Patient(
                        null,
                        patientData.getFirstName(),
                        patientData.getLastName(),
                        patientData.getEmail(),
                        patientData.getPhone()
                );
                patientRepository.save(patient);
            }

            @Override
            public void onError(Throwable t) {
                responseObserver.onError(t);
            }

            @Override
            public void onCompleted() {
                responseObserver.onNext(Empty.newBuilder().build());
                responseObserver.onCompleted();
            }
        };
    }

    // other methods remain the same
}
In the above code, we are using StreamObserver to handle the stream of patient data. onNext() is called for each patient data received from the client. onError() is called if there is an error. onCompleted() is called after all patient data is received.
To call this using grcpcurl:
grpcurl -d @ -plaintext localhost:9090 com.codewiz.patient.PatientService/StreamPatients <<EOM
{
  "first_name": "John",
  "last_name": "Smith",
  "email": "john.smith@example.com",
  "phone": "1234567890",
  "address": "123 Main St"
}
{
  "first_name": "Jane",
  "last_name": "Smith",
  "email": "jane.smith@example.com",
  "phone": "0987654321",
  "address": "456 Elm St"
}
EOM
public void uploadPatientData(List<PatientData> patientDataList) {
    final CountDownLatch finishLatch = new CountDownLatch(1);
    StreamObserver<Empty> responseObserver = new StreamObserver<Empty>() {
        @Override
        public void onNext(Empty response) {
            System.out.println("Response from server: ");
        }

        @Override
        public void onError(Throwable t) {
            Status status = Status.fromThrowable(t);
            System.err.println("UploadPatientData Failed: " + status);
            finishLatch.countDown();
        }

        @Override
        public void onCompleted() {
            System.out.println("Finished UploadPatientData");
            finishLatch.countDown();
        }
    };

    StreamObserver<PatientData> requestObserver = asyncStub.streamPatients(responseObserver);
    try {
        for (PatientData patientData : patientDataList) {
            requestObserver.onNext(patientData);
            Thread.sleep(500); // Simulate delay
        }
    } catch (RuntimeException e) {
        requestObserver.onError(e);
        throw e;
    }
    requestObserver.onCompleted();
    finishLatch.await(1, TimeUnit.MINUTES);
}
Here first we create a responseObserver to handle the response from the server after it receives all the messages from the client.
Then we pass that to the streamPatients method of the stub to get a requestObserver.
We then iterate over the list of PatientData and call requestObserver.onNext() for each patient data.
Finally, we call onCompleted() to indicate that all patient data has been sent.
After all patient data is sent, the server sends a response back to the client and responseObserver.onNext() and responseObserver.onCompleted() are called.
Since responseObserver runs asynchronously, we use CountDownLatch to wait for the server to send the response.
In bidirectional streaming, both the client and server send a stream of messages to each other. This is useful when the client and server need to send a stream of messages simultaneously.
Let us add a new RPC method Chat to the Doctor Service which accepts a stream of messages from the client and sends a stream of responses back.
service DoctorService {
  rpc GetDoctorDetails (GetDoctorDetailsRequest) returns (DoctorDetails);
  rpc Chat (stream ChatMessage) returns (stream ChatMessage);
}
Chat has a return type of stream which indicates that the server will send a stream of responses to the client.
Now let us generate Java classes from the proto file:
mvn clean compile
Now let us add a new method chat to the DoctorService class to handle the stream of chat messages.
@Service
public class DoctorService extends DoctorServiceGrpc.DoctorServiceImplBase {

    @Override
    public StreamObserver<ChatMessage> chat(StreamObserver<ChatMessage> responseObserver) {
        return new StreamObserver<ChatMessage>() {
            @Override
            public void onNext(ChatMessage chatMessage) {
                String randomMessage = "Message : " + Math.random();
                var response = ChatMessage.newBuilder()
                        .setMessage(randomMessage)
                        .setFrom("Doctor")
                        .setTo("Patient")
                        .setTimestamp(LocalDateTime.now().toString())
                        .build();
                responseObserver.onNext(response);
            }

            @Override
            public void onError(Throwable t) {
                responseObserver.onError(t);
            }

            @Override
            public void onCompleted() {
                responseObserver.onCompleted();
            }
        };
    }

    // other methods remain the same
}
In the above code, we are using StreamObserver to handle the stream of chat messages. onNext() is called for each chat message received from the client. onError() is called if there is an error. onCompleted() is called after all chat messages are received.
When a message is received from the client, the server sends a response back using responseObserver.onNext(). The client can send multiple messages to the server, and the server can send multiple responses back.
public void chat() {
    final CountDownLatch finishLatch = new CountDownLatch(1);
    StreamObserver<ChatMessage> responseObserver = new StreamObserver<ChatMessage>() {
        @Override
        public void onNext(ChatMessage response) {
            System.out.println("Response from server: " + response.getMessage());
        }

        @Override
        public void onError(Throwable t) {
            Status status = Status.fromThrowable(t);
            System.err.println("Chat Failed: " + status);
            finishLatch.countDown();
        }

        @Override
        public void onCompleted() {
            System.out.println("Finished Chat");
            finishLatch.countDown();
        }
    };

    StreamObserver<ChatMessage> requestObserver = asyncStub.chat(responseObserver);
    try {
        requestObserver.onNext(ChatMessage.newBuilder().setMessage("Hello").setFrom("Patient").setTo("Doctor").setTimestamp(LocalDateTime.now().toString()).build());
        Thread.sleep(500); // Simulate delay
        requestObserver.onNext(ChatMessage.newBuilder().setMessage("I need an appointment").setFrom("Patient").setTo("Doctor").setTimestamp(LocalDateTime.now().toString()).build());
        Thread.sleep(500); // Simulate delay
        requestObserver.onNext(ChatMessage.newBuilder().setMessage("Can you help me?").setFrom("Patient").setTo("Doctor").setTimestamp(LocalDateTime.now().toString()).build());
        Thread.sleep(500); // Simulate delay
    } catch (RuntimeException e) {
        requestObserver.onError(e);
        throw e;
    }
    requestObserver.onCompleted();
    finishLatch.await(5, TimeUnit.MINUTES)
}
Here first we create a responseObserver to handle stream of responses from the server. responseObserver.onNext() is called for each response received from the server. responseObserver.onError() is called if there is an error. responseObserver.onCompleted() is called after all responses are received.
Then we pass that to the chat method of the stub to get a requestObserver.
We then call requestObserver.onNext() for each chat message.
Finally, we call onCompleted() to indicate that all chat messages have been sent.
Since responseObserver runs asynchronously, we use CountDownLatch to wait for the server to send all responses.
gRPC is a great fit for service to service communication because of the performance benefits, strong typing, code generation and streaming capabilities. However, it is not a silver bullet and has some disadvantages:
gRPC is a high-performance, language-agnostic, and efficient way to build APIs and microservices. It provides features like strong typing, bidirectional streaming, and code generation. gRPC is suitable for performance-critical applications, microservices, and polyglot environments.
You can find the source code for this blog on our GitHub Repository.
To stay updated with the latest updates in Java and Spring, follow us on LinkedIn and Medium.
Learn how to build an AI-powered stock portfolio advisor using Java, Spring Boot, LangChain4j, and OpenAI/Ollama. This guide walks you through integrating AI into your application to provide real-time investment advice based on the latest stock data.
Complete guide to JWT authentication with Spring 6 Security. Learn best practices, implementation, and security without custom filters.
Find the most popular YouTube creators in tech categories like AI, Java, JavaScript, Python, .NET, and developer conferences. Perfect for learning, inspiration, and staying updated with the best tech content.
Get instant AI-powered summaries of YouTube videos and websites. Save time while enhancing your learning experience.
